Implementing Karpenter In EKS (From Start To Finish)
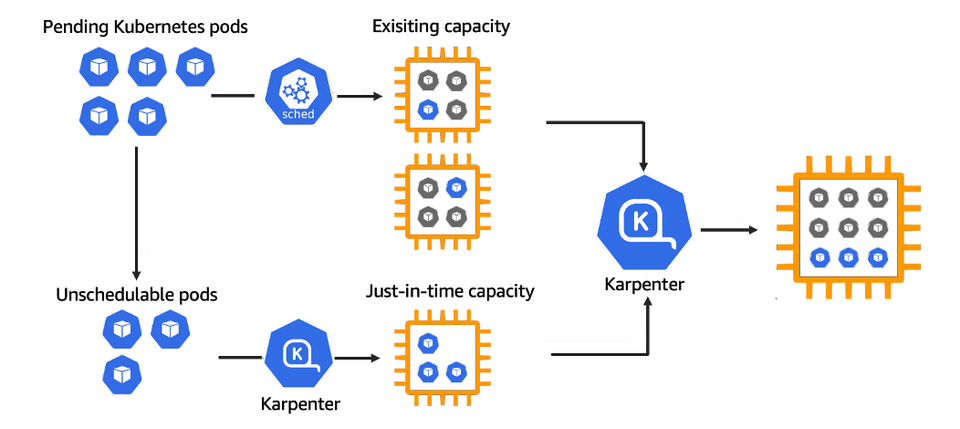
Without a cluster that can properly scale Nodes both up and down, the cluster can never perform as expected. Not only that, but engineers are forced to manage the scalability of a cluster manually. Both of these points can be rectified with proper resource optimization.
In this blog post, you'll learn step-by-step how to get Karpenter up and running on EKS from the IAM role to the permissions and the deployment of Karpenter itself.
Prerequisites
To follow along with this blog post, you should have the following:
- An AWS account. If you don't already have an account, you can sign up for one here.
High-Level Steps
There are a few things that you'll have to do to get Karpenter installed successfully:
- Create the EKS cluster where Karpenter is going to run.
- Add the OIDC URL from the cluster to IAM Providers.
- Create a new IAM Role that has permissions to scale EC2 instances (the worker nodes) via Karpenter
- Because it's being connected via IRSA (IAM Roles for Service Accounts), the Service Account will get automatically created as the OIDC URL for the EKS cluster is attached in IAM.
- Run the Helm Chart to deploy Karpenter
In the sections to come, you'll learn how to do each step from a programmatic perspective using Terraform
Create The EKS Cluster
To create the AWS EKS cluster, you'll use Terraform if you're following along within this blog post. If you already have an EKS cluster, you can skip this section.
- Ensure that there is an S3 bucket so the
tfstatecan be stored somewhere that isnt' local or ephemeral.
terraform {
  backend "s3" {
    bucket = "name_of_your_bucket"
    key    = "eks-terraform-workernodes.tfstate"
    region = "us-east-1"
  }
  required_providers {
    aws = {
      source = "hashicorp/aws"
    }
  }
}- Create the first IAM Role, which is for the EKS Control Plane.
resource "aws_iam_role" "eks-iam-role" {
  name = "k8squickstart-eks-iam-role"

  path = "/"

  assume_role_policy = <<EOF
{
  "Version": "2012-10-17",
  "Statement": [
    {
      "Effect": "Allow",
      "Principal": {
        "Service": "eks.amazonaws.com"
      },
      "Action": "sts:AssumeRole"
    }
  ]
}
EOF

}- The Control Plane needs the following AWS IAM Policies.
resource "aws_iam_role_policy_attachment" "AmazonEKSClusterPolicy" {
  policy_arn = "arn:aws:iam::aws:policy/AmazonEKSClusterPolicy"
  role       = aws_iam_role.eks-iam-role.name
}
resource "aws_iam_role_policy_attachment" "AmazonEC2ContainerRegistryReadOnly-EKS" {
  policy_arn = "arn:aws:iam::aws:policy/AmazonEC2ContainerRegistryReadOnly"
  role       = aws_iam_role.eks-iam-role.name
}

## Create the EKS cluster
resource "aws_eks_cluster" "k8squickstart-eks" {
  name = "k8squickstart-cluster"
  role_arn = aws_iam_role.eks-iam-role.arn

  enabled_cluster_log_types = ["api", "audit", "scheduler", "controllerManager"]
  version = var.k8sVersion
  vpc_config {
    subnet_ids = [var.subnet_id_1, var.subnet_id_2]
  }

  depends_on = [
    aws_iam_role.eks-iam-role,
  ]
}- Create the Control Plane.
resource "aws_eks_cluster" "k8squickstart-eks" {
  name = "k8squickstart-cluster"
  role_arn = aws_iam_role.eks-iam-role.arn

  enabled_cluster_log_types = ["api", "audit", "scheduler", "controllerManager"]
  version = var.k8sVersion
  vpc_config {
    subnet_ids = [var.subnet_id_1, var.subnet_id_2]
  }

  depends_on = [
    aws_iam_role.eks-iam-role,
  ]
}- Create the IAM Role for the Worker Nodes. Because AWS splits up the configuration between the Control Plane and the Worker Nodes (Node Groups), another IAM Role and policies are needed.
resource "aws_iam_role" "workernodes" {
  name = "eks-node-group-example"

  assume_role_policy = jsonencode({
    Statement = [{
      Action = "sts:AssumeRole"
      Effect = "Allow"
      Principal = {
        Service = "ec2.amazonaws.com"
      }
    }]
    Version = "2012-10-17"
  })
}- Attach the policies to the IAM Role for the Worker Nodes. Notice how there are a fair amount if policies needed. This is because the Worker Nodes are calling upon EC2 instances, so a lot of permissions are needed to create Worker Nodes within an EKS Node Group.
resource "aws_iam_role_policy_attachment" "AmazonEKSWorkerNodePolicy" {
  policy_arn = "arn:aws:iam::aws:policy/AmazonEKSWorkerNodePolicy"
  role       = aws_iam_role.workernodes.name
}

resource "aws_iam_role_policy_attachment" "AmazonEKS_CNI_Policy" {
  policy_arn = "arn:aws:iam::aws:policy/AmazonEKS_CNI_Policy"
  role       = aws_iam_role.workernodes.name
}

resource "aws_iam_role_policy_attachment" "EC2InstanceProfileForImageBuilderECRContainerBuilds" {
  policy_arn = "arn:aws:iam::aws:policy/EC2InstanceProfileForImageBuilderECRContainerBuilds"
  role       = aws_iam_role.workernodes.name
}

resource "aws_iam_role_policy_attachment" "AmazonEC2ContainerRegistryReadOnly" {
  policy_arn = "arn:aws:iam::aws:policy/AmazonEC2ContainerRegistryReadOnly"
  role       = aws_iam_role.workernodes.name
}

resource "aws_iam_role_policy_attachment" "CloudWatchAgentServerPolicy-eks" {
  policy_arn = "arn:aws:iam::aws:policy/CloudWatchAgentServerPolicy"
  role       = aws_iam_role.workernodes.name
}

resource "aws_iam_role_policy_attachment" "AmazonEBSCSIDriverPolicy" {
  policy_arn = "arn:aws:iam::aws:policy/service-role/AmazonEBSCSIDriverPolicy"
  role       = aws_iam_role.workernodes.name
}- Create the Worker Nodes.
resource "aws_eks_node_group" "worker-node-group" {
  cluster_name    = aws_eks_cluster.k8squickstart-eks.name
  node_group_name = "k8squickstart-workernodes"
  node_role_arn   = aws_iam_role.workernodes.arn
  subnet_ids      = [var.subnet_id_1, var.subnet_id_2]
  instance_types = ["t3.2xlarge"]

  scaling_config {
    desired_size = var.desired_size
    max_size     = 4
    min_size     = var.min_size
  }

  depends_on = [
    aws_iam_role_policy_attachment.AmazonEKSWorkerNodePolicy,
    aws_iam_role_policy_attachment.AmazonEKS_CNI_Policy,
    #aws_iam_role_policy_attachment.AmazonEC2ContainerRegistryReadOnly,
  ]
}- The final step is to add the CSI addon in EKS.
resource "aws_eks_addon" "csi" {
  cluster_name = aws_eks_cluster.k8squickstart-eks.name
  addon_name   = "aws-ebs-csi-driver"
}- Putting it all together, the configuration should look like the below. Ensure to create a
main.tfto add the following Terraform code to.
terraform {
  backend "s3" {
    bucket = "name_of_your_bucket"
    key    = "eks-terraform-workernodes.tfstate"
    region = "us-east-1"
  }
  required_providers {
    aws = {
      source = "hashicorp/aws"
    }
  }
}


# IAM Role for EKS to have access to the appropriate resources
resource "aws_iam_role" "eks-iam-role" {
  name = "k8squickstart-eks-iam-role"

  path = "/"

  assume_role_policy = <<EOF
{
  "Version": "2012-10-17",
  "Statement": [
    {
      "Effect": "Allow",
      "Principal": {
        "Service": "eks.amazonaws.com"
      },
      "Action": "sts:AssumeRole"
    }
  ]
}
EOF

}

## Attach the IAM policy to the IAM role
resource "aws_iam_role_policy_attachment" "AmazonEKSClusterPolicy" {
  policy_arn = "arn:aws:iam::aws:policy/AmazonEKSClusterPolicy"
  role       = aws_iam_role.eks-iam-role.name
}
resource "aws_iam_role_policy_attachment" "AmazonEC2ContainerRegistryReadOnly-EKS" {
  policy_arn = "arn:aws:iam::aws:policy/AmazonEC2ContainerRegistryReadOnly"
  role       = aws_iam_role.eks-iam-role.name
}

## Create the EKS cluster
resource "aws_eks_cluster" "k8squickstart-eks" {
  name = "k8squickstart-cluster"
  role_arn = aws_iam_role.eks-iam-role.arn

  enabled_cluster_log_types = ["api", "audit", "scheduler", "controllerManager"]
  version = var.k8sVersion
  vpc_config {
    subnet_ids = [var.subnet_id_1, var.subnet_id_2]
  }

  depends_on = [
    aws_iam_role.eks-iam-role,
  ]
}

## Worker Nodes
resource "aws_iam_role" "workernodes" {
  name = "eks-node-group-example"

  assume_role_policy = jsonencode({
    Statement = [{
      Action = "sts:AssumeRole"
      Effect = "Allow"
      Principal = {
        Service = "ec2.amazonaws.com"
      }
    }]
    Version = "2012-10-17"
  })
}

resource "aws_iam_role_policy_attachment" "AmazonEKSWorkerNodePolicy" {
  policy_arn = "arn:aws:iam::aws:policy/AmazonEKSWorkerNodePolicy"
  role       = aws_iam_role.workernodes.name
}

resource "aws_iam_role_policy_attachment" "AmazonEKS_CNI_Policy" {
  policy_arn = "arn:aws:iam::aws:policy/AmazonEKS_CNI_Policy"
  role       = aws_iam_role.workernodes.name
}

resource "aws_iam_role_policy_attachment" "EC2InstanceProfileForImageBuilderECRContainerBuilds" {
  policy_arn = "arn:aws:iam::aws:policy/EC2InstanceProfileForImageBuilderECRContainerBuilds"
  role       = aws_iam_role.workernodes.name
}

resource "aws_iam_role_policy_attachment" "AmazonEC2ContainerRegistryReadOnly" {
  policy_arn = "arn:aws:iam::aws:policy/AmazonEC2ContainerRegistryReadOnly"
  role       = aws_iam_role.workernodes.name
}

resource "aws_iam_role_policy_attachment" "CloudWatchAgentServerPolicy-eks" {
  policy_arn = "arn:aws:iam::aws:policy/CloudWatchAgentServerPolicy"
  role       = aws_iam_role.workernodes.name
}

resource "aws_iam_role_policy_attachment" "AmazonEBSCSIDriverPolicy" {
  policy_arn = "arn:aws:iam::aws:policy/service-role/AmazonEBSCSIDriverPolicy"
  role       = aws_iam_role.workernodes.name
}
resource "aws_eks_node_group" "worker-node-group" {
  cluster_name    = aws_eks_cluster.k8squickstart-eks.name
  node_group_name = "k8squickstart-workernodes"
  node_role_arn   = aws_iam_role.workernodes.arn
  subnet_ids      = [var.subnet_id_1, var.subnet_id_2]
  instance_types = ["t3.2xlarge"]

  scaling_config {
    desired_size = var.desired_size
    max_size     = 4
    min_size     = var.min_size
  }

  depends_on = [
    aws_iam_role_policy_attachment.AmazonEKSWorkerNodePolicy,
    aws_iam_role_policy_attachment.AmazonEKS_CNI_Policy,
    #aws_iam_role_policy_attachment.AmazonEC2ContainerRegistryReadOnly,
  ]
}

resource "aws_eks_addon" "csi" {
  cluster_name = aws_eks_cluster.k8squickstart-eks.name
  addon_name   = "aws-ebs-csi-driver"
}
The next step is the variables.tf file, which you can find below:
variable "subnet_id_1" {
  type = string
  default = ""
}

variable "subnet_id_2" {
  type = string
  default = ""
}

variable "desired_size" {
  type = string
  default = 3
}
variable "min_size" {
  type = string
  default = 3
}

variable "k8sVersion" {
  default = "1.32"
  type = string
}
Once you've added in the values of your choosing (like the subnet IDs in the variables.tf) in the Terraform code above, you can run the following commands.
terraform init
terraform plan
terraform apply --auto-approve
When the cluster is created, move onto the next section.
Configure OIDC For Your Cluster
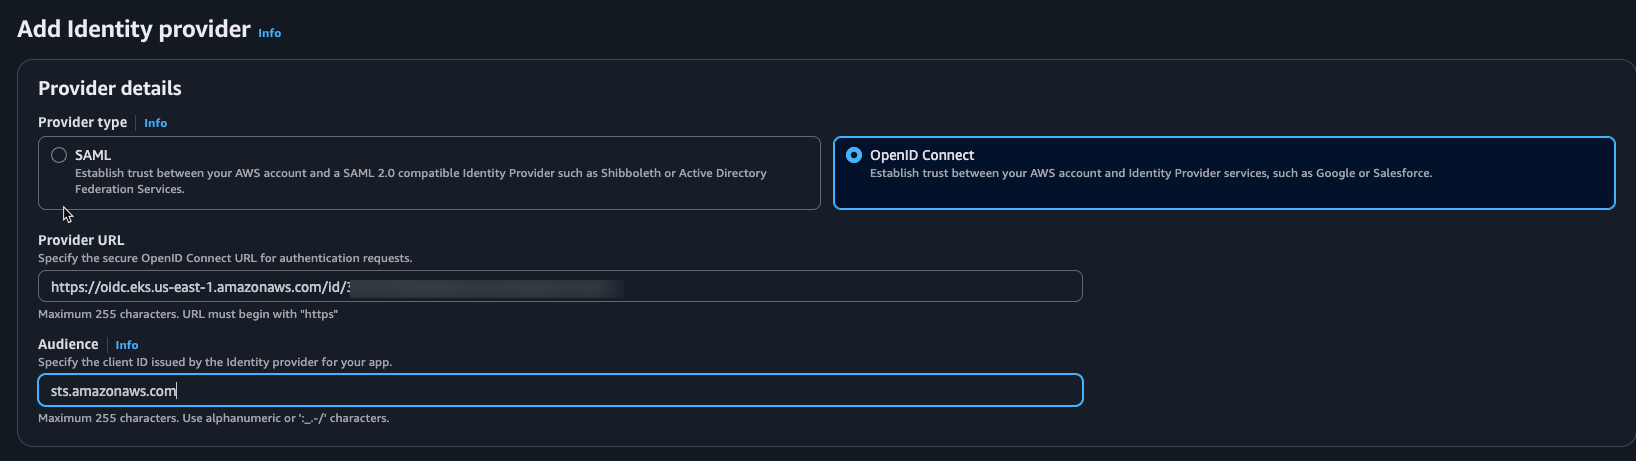
The next step is to copy the OIDC URL from your EKS cluster and add it to the IAM Provider section. This is a requirement in EKS as of April 2023.
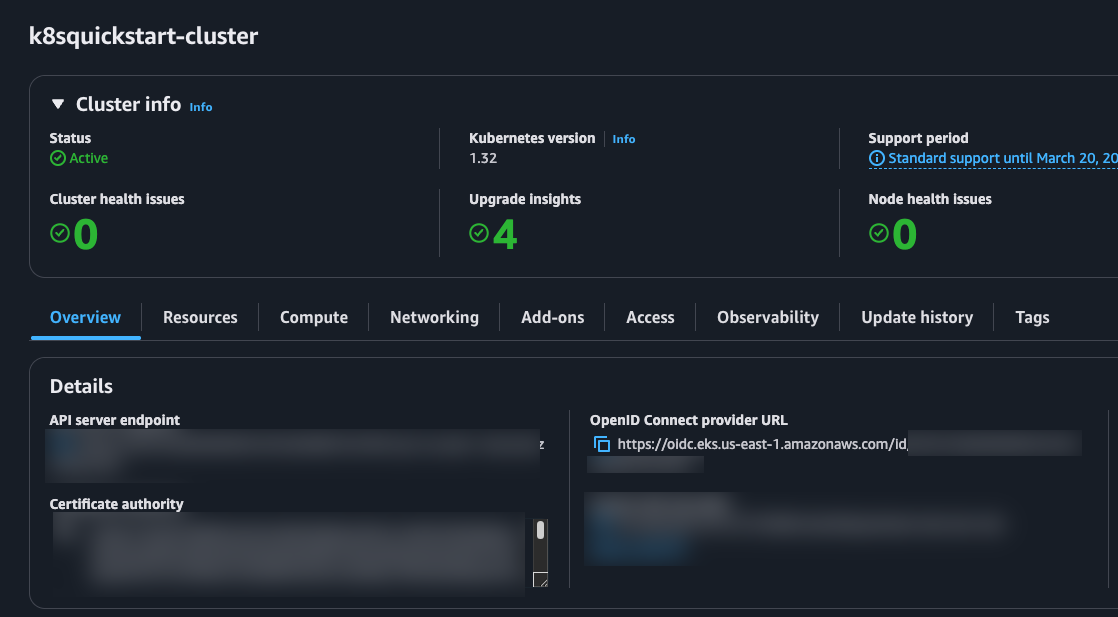
- Log into AWS and go to your EKS cluster. You'll see the OpenID Connect provider URL. Copy the value of the URL.
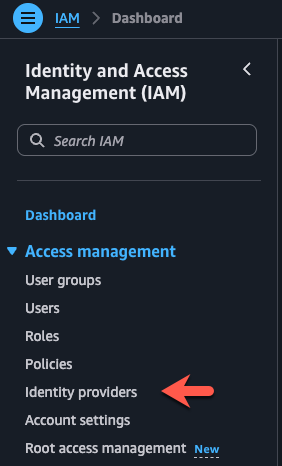
- Within IAM, click on Identity providers.
- Click the orange Add provider button.

- Choose the OpenID Connect option and paste in the OIDC URL.
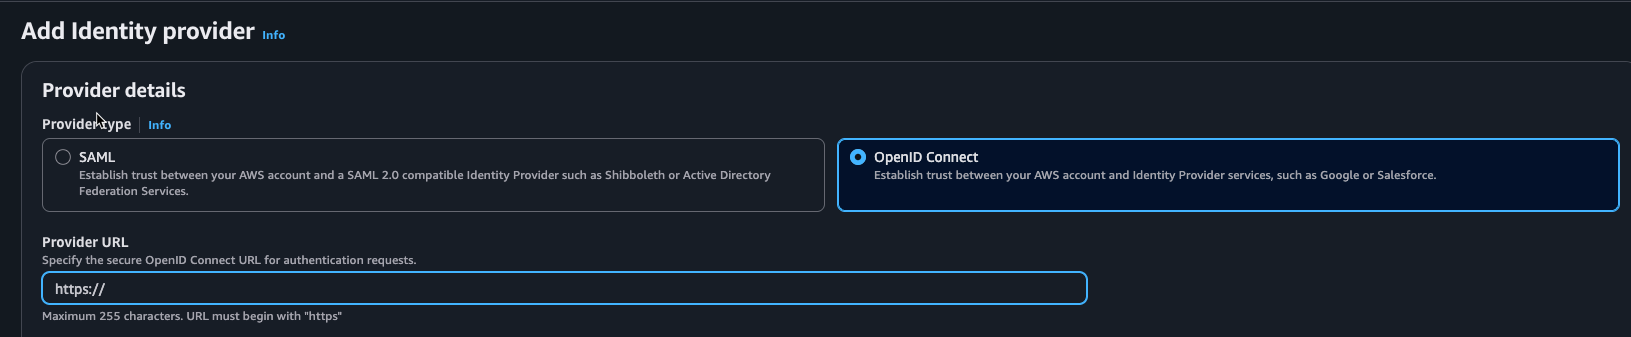
- Add the audience, which is:
sts.amazonaws.com
If you'd like more detailed instructions, you can find them here: https://docs.aws.amazon.com/eks/latest/userguide/enable-iam-roles-for-service-accounts.html
Configuring An IAM Role For Karpenter To Access EC2
Now that the cluster is created and the OIDC provider is added to IAM, let's create the IAM Role that is needed for Karpenter.
With Karpenter, it needs direct access to EC2 because it needs the ability to scale the EC2 instances up and down as the instances are the EKS Worker Nodes.
- The configuration below will create the necassary IAM Role and attach the needed policies.
provider "aws" {
  region = "us-east-1"
}

terraform {
  required_version = ">= 1.0.0"

  required_providers {
    aws = {
      source  = "hashicorp/aws"
      version = ">= 4.0.0"
    }
  }
}

# IAM role for Karpenter
resource "aws_iam_role" "karpenter" {
  name = "karpenter-role"

  assume_role_policy = jsonencode({
    Version = "2012-10-17"
    Statement = [
      {
        Effect = "Allow"
        Principal = {
          Federated = "arn:aws:iam::${data.aws_caller_identity.current.account_id}:oidc-provider/${var.oidc_provider_url}"
        }
        Action = "sts:AssumeRoleWithWebIdentity"
        Condition = {
          StringEquals = {
            "${var.oidc_provider_url}:sub": "system:serviceaccount:karpenter:karpenter",
            "${var.oidc_provider_url}:aud": "sts.amazonaws.com"
          }
        }
      }
    ]
  })
}

# Get AWS account ID for IAM role
data "aws_caller_identity" "current" {}

# Karpenter controller policy
resource "aws_iam_policy" "karpenter" {
  name        = "KarpenterControllerPolicy-${var.cluster_name}"
  description = "IAM policy for Karpenter controller"

  policy = jsonencode({
    Version = "2012-10-17"
    Statement = [
      {
        Effect = "Allow"
        Action = [
          "ec2:CreateFleet",
          "ec2:CreateLaunchTemplate",
          "ec2:CreateTags",
          "ec2:DeleteLaunchTemplate",
          "ec2:DescribeAvailabilityZones",
          "ec2:DescribeImages",
          "ec2:DescribeInstances",
          "ec2:DescribeInstanceTypeOfferings",
          "ec2:DescribeInstanceTypes",
          "ec2:DescribeLaunchTemplates",
          "ec2:DescribeSecurityGroups",
          "ec2:DescribeSubnets",
          "ec2:RunInstances",
          "ec2:TerminateInstances",
          "ec2:DescribeInstanceStatus",
          "iam:PassRole",
          "ssm:GetParameter"
        ]
        Resource = "*"
      },
      {
        Effect   = "Allow"
        Action   = ["eks:DescribeCluster"]
        Resource = "arn:aws:eks:*:*:cluster/${var.cluster_name}"
      }
    ]
  })
}

# Attach the policy to the Karpenter role
resource "aws_iam_role_policy_attachment" "karpenter" {
  role       = aws_iam_role.karpenter.name
  policy_arn = aws_iam_policy.karpenter.arn
}

# Instance profile for Karpenter nodes
resource "aws_iam_instance_profile" "karpenter" {
  name = "KarpenterNodeInstanceProfile-${var.cluster_name}"
  role = aws_iam_role.karpenter.name
}- Notice how the variables below include the cluster name and the OIDC provider URL. This is to ensure that the Service Account gets created within the cluster.
variable "cluster_name" {
  description = "Name of the EKS cluster"
  type        = string
  default = ""
}

variable "oidc_provider_url" {
  description = "URL of the OIDC provider (without https://)"
  type        = string
  default = ""
}
A very important distinction here is to ensure that you add the OIDC provider WITHOUT https://.
- Create the Role via Terraform and confirm that it is working as expected via the following command:
aws iam get-role --role-name karpenter-role --query Role.AssumeRolePolicyDocumentYou should see an output similuar to the one below.
{
    "Version": "2012-10-17",
    "Statement": [
        {
            "Effect": "Allow",
            "Principal": {
                "Federated": "arn:aws:iam::aws_account_id:oidc-provider/oidc.eks.us-east-1.amazonaws.com/id/oidc_id"
            },
            "Action": "sts:AssumeRoleWithWebIdentity",
            "Condition": {
                "StringEquals": {
                    "oidc.eks.us-east-1.amazonaws.com/id/oidc_id:aud": "sts.amazonaws.com",
                    "oidc.eks.us-east-1.amazonaws.com/id/oidc_id:sub": "system:serviceaccount:karpenter:karpenter"
                }
            }
        }
    ]
}
Installing Karpenter Via Helm
Last but certainly not least is to install Karpenter. There are a few different ways to do this, but Helm as is the most used as it's the universal package manager for Kubernetes.
- If you're already logged into a public ECR, you may need to log out.
helm registry logout public.ecr.aws- Run the following and ensure that you put your EKS cluster name in where it says
${EKS_CLUSTER_NAME}.
      helm upgrade --install karpenter oci://public.ecr.aws/karpenter/karpenter --namespace karpenter --create-namespace \
        --set "settings.clusterName=${EKS_CLUSTER_NAME}" \
        --set "settings.interruptionQueue=${EKS_CLUSTER_NAME}" \
        --set controller.resources.requests.cpu=1 \
        --set controller.resources.requests.memory=1Gi \
        --set controller.resources.limits.cpu=1 \
        --set controller.resources.limits.memory=1Gi \
        --wait
Three important things to keep in mind:
- The installation may time out
- You might see a lot of
CrashBackLoopsandErrorsalong with the Karpenter Pods restarting. - You may see an error similar to the one below.
panic: operation error ec2imds: GetRegion, canceled, context deadline exceededIt appears that there is some type of dependency which requires several restarts of the Karpenter Pods before they get up and running. It's been known to see restarts of the Pods up to 25 times before the Pods are running. Don't be alarmed if this occurs within your environment.
Once everything is up and running, you should see a configuration similiar to the one below.
Configuring Scalability Options
Now that Karpenter is installed, it's time to configure the options that you wish to use for scalability within your cluster. Although Karpenter is already installed, the configurations for what nodes, types, sizes, etc. you want to use as Worker Nodes within your cluster when scaling up and scaling down based on load.
What you'll typically create are two objects:
- NodePool: Defines the requirements for the nodes (instance types, scheduling policies, etc.)
- EC2NodeClass: Sets the details of how the nodes are created (AMIs, which IAM Role to use which you created in a previous section, network settings, etc.)
These objects are used within a Kubernetes Manifest just like anything else being deployed to Kubernetes. It uses an Operator specifically created for Karpenter.
- Create an alias of the latest version of the optimized AMI for the Kubernetes version that you're running within your cluster. Please remember to update the
${K8S_VERSION}variable in the line below with the actual Kubernetes version you're running.
export ALIAS_VERSION="$(aws ssm get-parameter --name "/aws/service/eks/optimized-ami/${K8S_VERSION}/amazon-linux-2023/x86_64/standard/recommended/image_id" --query Parameter.Value | xargs aws ec2 describe-images --query 'Images[0].Name' --image-ids | sed -r 's/^.*(v[[:digit:]]+).*$/\1/')"
- The next step is to configure:
- The Node Pool
- The Node Class reference
Notice how in the example below, under spec > requirements is where the instance types are specified that can be used within your cluster when scaling Worker Nodes. You can change these out if you'd like and should definitely understand exactly which Node Types will be available in your cluster.
When you're ready, save the below in a file called karpenter.yaml and run it on your cluster with: kubectl apply -f karpenter.yaml.
apiVersion: karpenter.sh/v1
kind: NodePool
metadata:
  name: default
spec:
  template:
    spec:
      requirements:
        - key: kubernetes.io/arch
          operator: In
          values: ["amd64"]
        - key: kubernetes.io/os
          operator: In
          values: ["linux"]
        - key: karpenter.sh/capacity-type
          operator: In
          values: ["on-demand"]
        - key: karpenter.k8s.aws/instance-category
          operator: In
          values: ["c", "m", "r"]
        - key: karpenter.k8s.aws/instance-generation
          operator: Gt
          values: ["2"]
      nodeClassRef:
        group: karpenter.k8s.aws
        kind: EC2NodeClass
        name: default
      expireAfter: 720h # 30 * 24h = 720h
  limits:
    cpu: 1000
  disruption:
    consolidationPolicy: WhenEmptyOrUnderutilized
    consolidateAfter: 1m
---
apiVersion: karpenter.k8s.aws/v1
kind: EC2NodeClass
metadata:
  name: default
spec:
  role: "KARPENTER_ROLE_THAT_YOU_CREATED"
  amiSelectorTerms:
    - alias: "al2023@${ALIAS_VERSION}"
  subnetSelectorTerms:
    - tags:
        karpenter.sh/discovery: "YOUR_CLUSTER_NAME"
  securityGroupSelectorTerms:
    - tags:
        karpenter.sh/discovery: "YOUR_CLUSTER_NAME"
Conclusion
There are a lot of steps to fully set up Karpenter. The primary reason behind this blog post, other than that it was fun to write, was the majority of resources out there don't go through the specific steps when using Terraform. A lot of it is with eksctl or it only shows you bits and pieces (for example, blogs that just show the Karpenter Helm config, not the full IAM Role process). With that, I hope this blog post helped you!

Comments ()