Routing AI Traffic From Your IDE Through Agentgateway With Agentregistry
As teams and the enterprise are figuring out various ways to secure traffic from Agents to LLMs, other Agents, or MCP Servers, what about the lowest barrier to entry? Someone's local configuration. Agentregistry helps by creating the configuration and agentgateway provides a specialized AI gateway to route through.
In this blog post, you'll learn how to secure, observe, and route traffic through agentgateway from your IDE (VSCode, Cursor, Claude Desktop) with agentregistry.
Prerequisites
To follow along with this blog post from a hands-on perspective, you should have the following:
- A Kubernetes cluster.
- VSCode installed.
Installation
To not only route traffic through an AI gateway to observe and secure it, you also need to generate configurations so your IDE knows how to route traffic through the gateway. In this section, you'll install the two OSS tools needed to accomplish this - agentgateway and agentregistry.
Agentgateway is the AI Gateway and agentregistry is the centralized hub for all deployment and registry needs when it comes to LLMs, Agents, Skills, and MCP Servers.
Agentgateway
- Install the Kubernetes Gateway API CRDs as the
GatewayandHTTPRouteobjects will be used in an upcoming section for the dataplane proxy.
kubectl apply -f https://github.com/kubernetes-sigs/gateway-api/releases/download/v1.4.0/standard-install.yaml- Install the agentgateway CRDs.
helm upgrade -i --create-namespace \
  --namespace agentgateway-system \
--version v2.2.0-main agentgateway-crds oci://ghcr.io/kgateway-dev/charts/agentgateway-crds - Install agentgateway.
helm upgrade -i -n agentgateway-system agentgateway oci://ghcr.io/kgateway-dev/charts/agentgateway \
--version v2.2.0-main- You should now see the Control Plane running.
kubectl get pods -n agentgateway-systemAgentregistry
- Run the following
curlcommand to install the agentregistry CLI.
curl -fsSL https://raw.githubusercontent.com/agentregistry-dev/agentregistry/main/scripts/get-arctl | bashAt the time of writing this, agentregistry runs locally on your system, which is a good use case for routing traffic through an IDE that is also running on your system.
Deploy An MCP Server
The next step is to deploy an MCP Server that you can reach over your Gateway. The below Kubernetes Manifest calls out to an MCP Server that is in a public Docker container image via Dockerhub (I created it) that is using the Streamable HTTP protocol. If you don't have an MCP Server already, you can use the below to test.
kubectl apply -f - <<EOF
apiVersion: apps/v1
kind: Deployment
metadata:
  name: mcp-server
  labels:
    app: mcp-server
spec:
  replicas: 1
  selector:
    matchLabels:
      app: mcp-server
  template:
    metadata:
      labels:
        app: mcp-server
    spec:
      containers:
      - name: mcp-server
        image: adminturneddevops/mcp-oauth-demo:v0.1
        imagePullPolicy: IfNotPresent
        ports:
        - containerPort: 8080
          name: http
        env:
        - name: PORT
          value: "8080"
        - name: HOST
          value: "0.0.0.0"
        resources:
          requests:
            memory: "128Mi"
            cpu: "100m"
          limits:
            memory: "256Mi"
            cpu: "200m"
---
apiVersion: v1
kind: Service
metadata:
  name: mcp-server
  labels:
    app: mcp-server
spec:
  selector:
    app: mcp-server
  ports:
  - name: http
    port: 8080
    targetPort: 8080
  type: ClusterIP
EOF
You should see the MCP Server running in your Default Namespace.
kubectl get pods
NAME                          READY   STATUS    RESTARTS   AGE
mcp-server-7d79ddffc8-n5ckl   1/1     Running   0          21m
Creating The Configuration
The final step is to create the configurations for both agentgateway and agentregistry. Agentregistry is going to provide the JSON configuration that you need to route through agentgateway and agentgateway is going to give you an AI gateway.
Agentgateway Configuration
- Create a new
Gatewayobject.
kubectl apply -f - <<EOF
apiVersion: gateway.networking.k8s.io/v1
kind: Gateway
metadata:
  name: mcp-gateway
  namespace: agentgateway-system
  labels:
    app: mcp-gateway
spec:
  gatewayClassName: agentgateway
  listeners:
    - name: mcp
      port: 3000
      protocol: HTTP
      allowedRoutes:
        namespaces:
          from: Same
EOF- Use the
AgentgatewayBackendobject to ensure the Gateway knows how to route your traffic through the MCP Servers k8s Service.
kubectl apply -f - <<EOF
apiVersion: agentgateway.dev/v1alpha1
kind: AgentgatewayBackend
metadata:
  name: demo-mcp-server
  namespace: agentgateway-system
spec:
  mcp:
    targets:
      - name: demo-mcp-server
        static:
          host: mcp-server.default.svc.cluster.local
          port: 8080
          path: /mcp
          protocol: StreamableHTTP
EOF- Create a routing object to ensure the traffic routes through the Gateway to the proper location. In this case, the "proper location" target reference is the Agentgateway Backend object.
kubectl apply -f - <<EOF
apiVersion: gateway.networking.k8s.io/v1
kind: HTTPRoute
metadata:
  name: mcp-route
  namespace: agentgateway-system
  labels:
    app: mcp-gateway
spec:
  parentRefs:
    - name: mcp-gateway
  rules:
    - backendRefs:
      - name: demo-mcp-server
        namespace: agentgateway-system
        group: agentgateway.dev
        kind: AgentgatewayBackend
EOF- Ensure that the Gateway is up and running.
kubectl get gateway -n agentgateway-systemYou'll see your Gateway and its IP address.
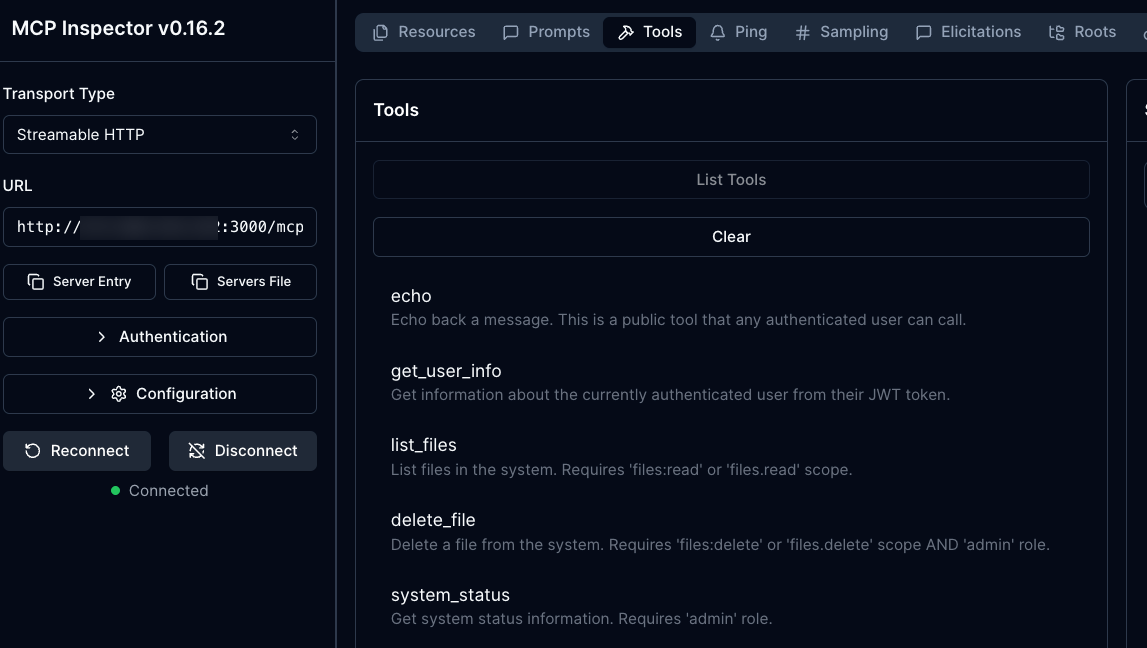
mcp-gateway agentgateway x0.x.2xx.xx2 True 14m- Test the Gateway and confirm it's working via an MCP Client like MCP Inspector.
npx modelcontextprotocol/inspector#0.16.2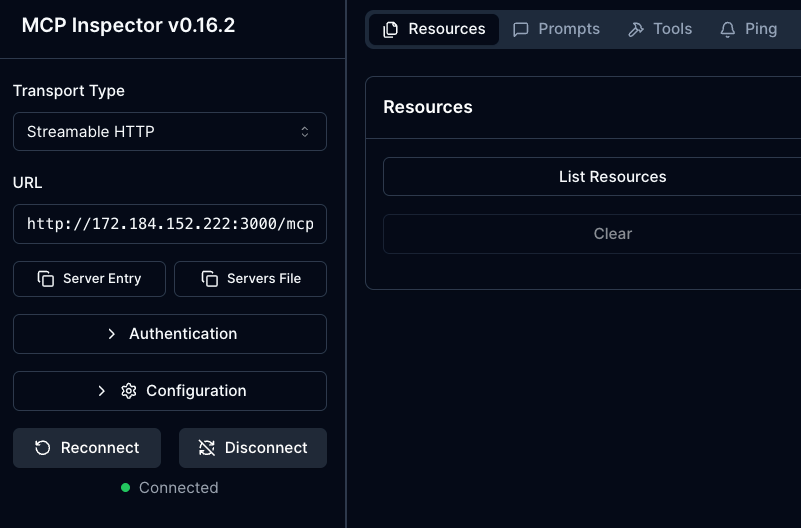
Agentregistry Configuration
- Run the
configurecommand withvscodeas the subcommand.
arctl configure vscodeYou'll see an output similar to the below:
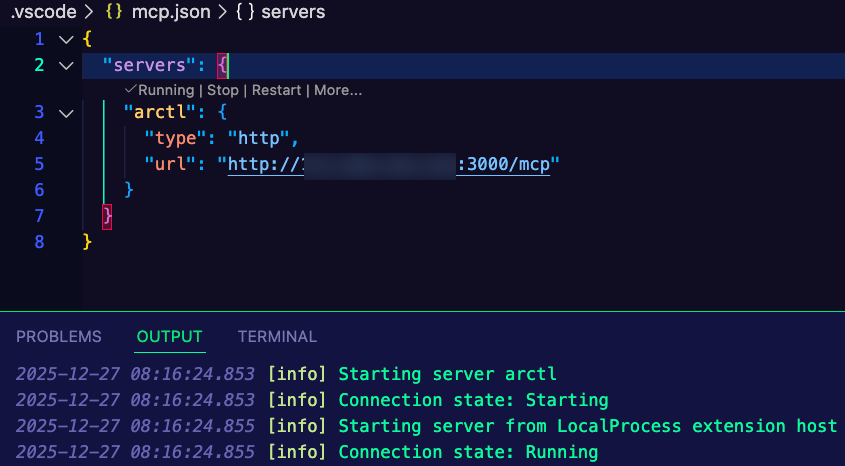
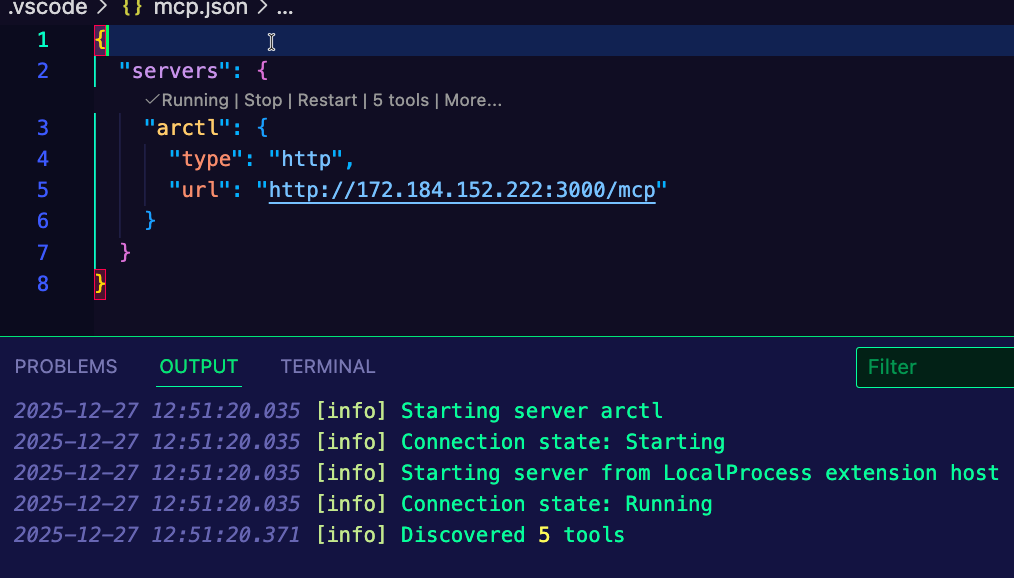
✓ Configured Visual Studio CodeOpen the mcp.json file that was created.
Replace the default URL with your Gateway IP address, the port, and /mcp path because that's what is configured for the path within the MCP server code itself (you can see more here). For example, if your Gateway IP address is 20.50.40.30, the URL should be http://20.50.40.30:3000/mcp because 3000 is the port that you configured in the previous step when creating the Gateway object.
Run the configuration in VSCode and you should see an output similar to the below:


Comments ()