Enable MicroVM Agent Sandboxes with Agent Substrate (Kata + Cloud Hypervisor)
Three times over the past month, the industry has seen Agents break out of sandboxes. It happened with OpenAI, Anthropic, and Meta Models. Despite them being "in a sandbox", there was still an entry point to the outside world.
Why?
OpenAI used software isolation (network proxy + sandbox), not hardware isolation or true air-gapping. Anthropic and Meta didn't use hardware isolation either.
This brings us to one question: is software isolation for sandboxing enough?
In this blog post, you'll learn the key differences between software/hardware isolation, why hardware isolation will provide the best results for sandboxing, and how to implement it with MicroVM.
Prerequisites
To follow along with this blog post from a hands-on perspective, you will need:
- A GKE cluster
- Agent Substrate installed. You can learn how to do that here.
- A Node Pool that supports nested virtualization (e.g -
n2-standard-4) - The Substrate repo cloned. You can find it here.
- Snapshot bucket, which must allow the node/atelet identity to create objects (storage.objects.create, e.g. roles/storage.objectAdmin on the bucket). Read-only / bucketViewer is not enough for golden snapshots.
If you don't have all of this right now, that's totally fine. It's still good to look through the blog so you get a conceptual understanding of how agent sandboxing will work with Agent Substrate using MicroVM.
Quick Substrate Installation Check
To ensure Substrate is installed and working successfully, you can run the following:
source .ate-dev-env.sh
kubectl get pods -n ate-system
Then, ensure that there's a sandboxClass on the nodes you're running to ensure the nodes can be enabled with MicroVM.
kubectl get nodes -L ate.dev/sandboxClassCatch-up on Agent Sandbox
Sandboxes are isolation environments where Agents can run code, run tasks, edit files, and perform whatever actions are asked of it without harming your main server/system/laptop/desktop.
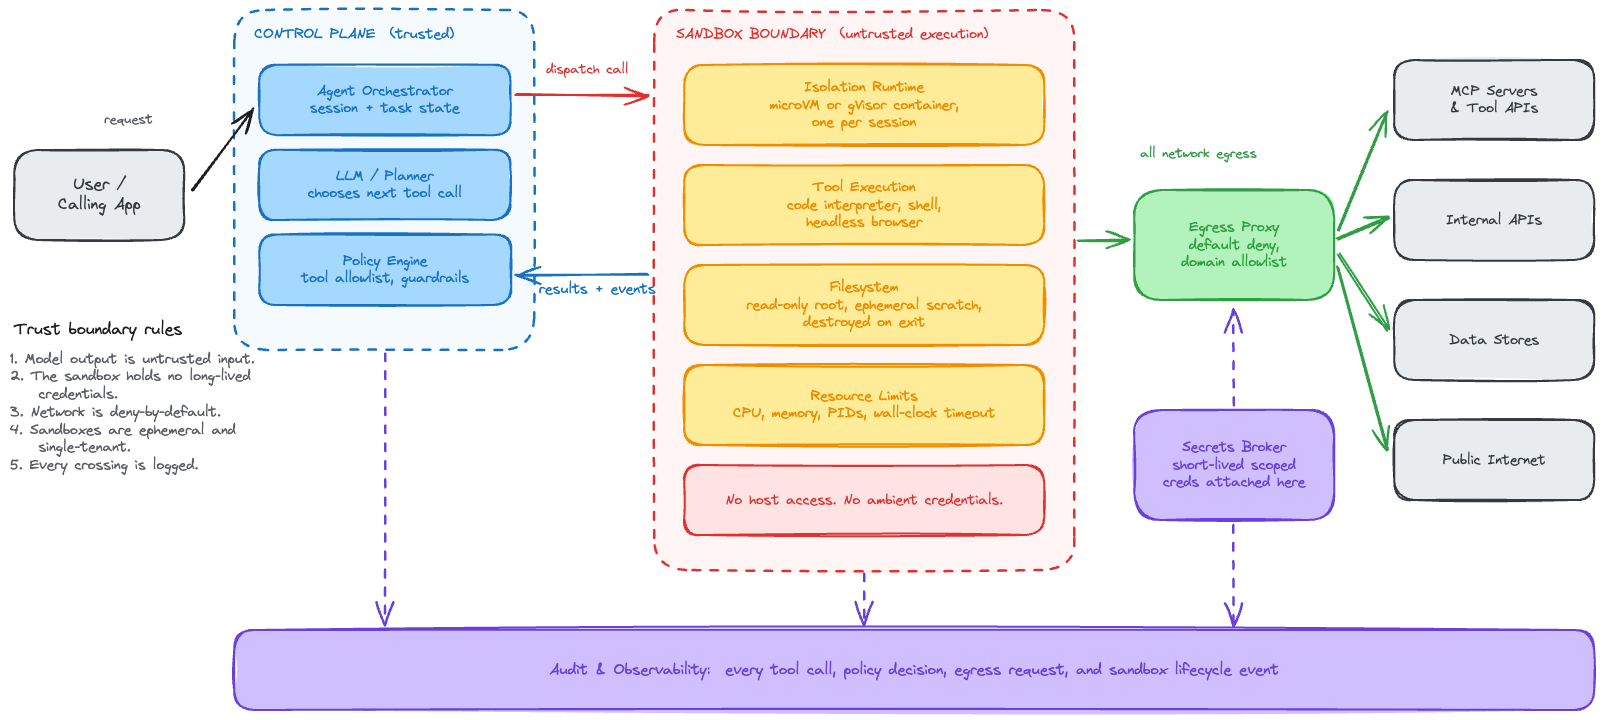
For example, if you're running an Agent in a sandbox, it should ideally not be able to access the main file directory in your core system. That means it can't hit your home directory, documents folder, etc... On a production server, this is very important as it's serving a plethora of workloads that an organization is hosting.
MicroVM and gVisor
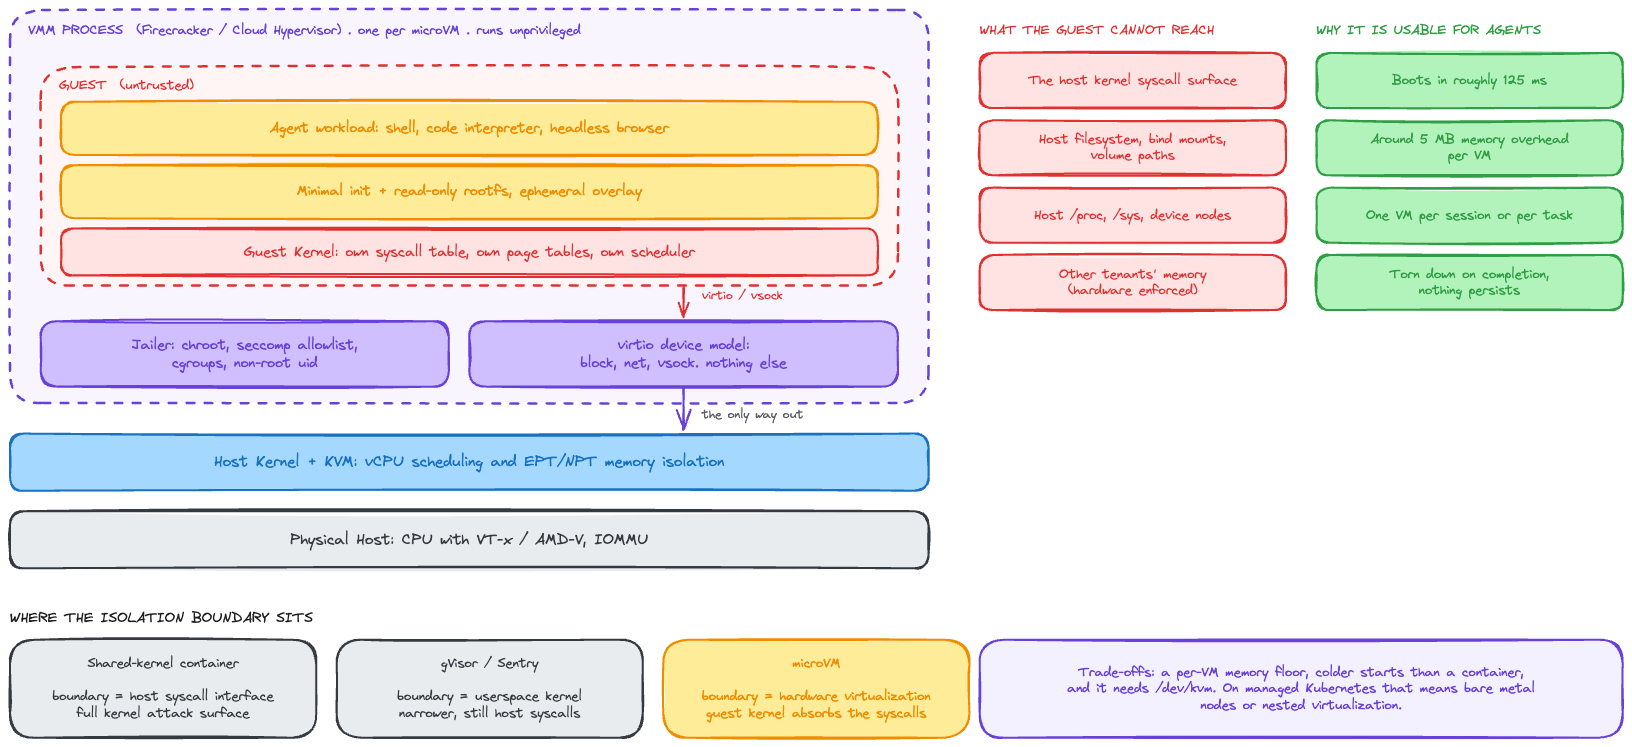
gVisor isolation at the software/kernel level. It runs a separate app kernel in user space and intercepts system calls before they hit the host kernel. Its goal is to limit direct contact with the host kernel. When the app inside the sandbox triggers a system call, gVisor intercepts it.
MicroVM provides isolation at the hardware level. It utilizes underlying virtualization technologies (e.g - VT-x, AMD-V) to spin up a tiny Linux kernel where the workloads run. It boots a stripped-down Linux kernel. This creates a true hardware-enforced boundary in comparison to gVisor creating a software sandbox boundary that still runs on the host kernel.
Enabling MicroVM
Now that you know a bit about hardware isolation, software isolation, and why agent sandboxing is drastically important for all agentic workloads, let's learn from a hands-on perspective how to enable hardware isolation in Agent Substrate with MicroVM.
- Get the sandbox configuration. You'll see that by default, it;s gVisor.
kubectl get sandboxconfig- To enable MicroVM for hardware isolation, you'll first need to get a list of your running nodes.
kubectl get nodes- Then, you can label one or all of the nodes to use MicroVM.
kubectl label node <NODE_NAME> ate.dev/sandboxClass=microvmWith that, your workloads are now ready to use hardware isolation.
Deploying Workloads That Use MicroVM
To use hardware isolation, you'll of course need a workload that can utilize said isolation. Because there are going to be Actors that use MicroVM instead of gVisor, the first thing you may think is "do I need to specify the node to deploy to when creating an Actor?" and the answer is no. Actors are not scheduled onto nodes directly. Instead, the class is chosen via the template and matching pool.
There are three objects you'll need to make this happen:
SandboxConfigWorkerPoolActorTemplate
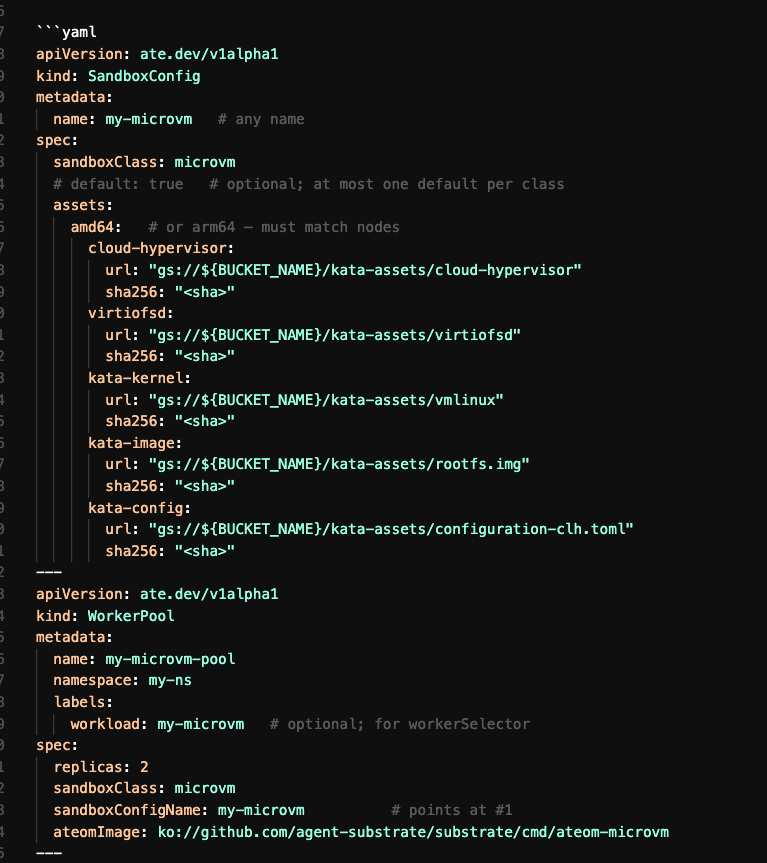
SandboxConfig is, as the name suggests, the configuration for your MicroVM sandbox. A WorkerPool is a set of pre-warmed sandbox Pods. When you see the term "Worker" used in Agent Substrate, it's the Pods where your Actors run. Actors can be anything from Agents to Web APIs. The ActorTemplate is like the golden image for your Actors. It represents the saved state of an Actor, hence why there's a parameter for snapshotsConfig where the state of your Actor is saved. You'll also see ateom used, which communicates directly with MicroVM (or gVisor) to manage the sandbox agent execution.
Below is what an example config looks like.
apiVersion: ate.dev/v1alpha1
kind: SandboxConfig
metadata:
  name: my-microvm   # any name
spec:
  sandboxClass: microvm
  # default: true   # optional; at most one default per class
  assets:
    amd64:   # or arm64 — must match nodes
      cloud-hypervisor:
        url: "gs://${BUCKET_NAME}/kata-assets/cloud-hypervisor"
        sha256: "<sha>"
      virtiofsd:
        url: "gs://${BUCKET_NAME}/kata-assets/virtiofsd"
        sha256: "<sha>"
      kata-kernel:
        url: "gs://${BUCKET_NAME}/kata-assets/vmlinux"
        sha256: "<sha>"
      kata-image:
        url: "gs://${BUCKET_NAME}/kata-assets/rootfs.img"
        sha256: "<sha>"
      kata-config:
        url: "gs://${BUCKET_NAME}/kata-assets/configuration-clh.toml"
        sha256: "<sha>"
---
apiVersion: ate.dev/v1alpha1
kind: WorkerPool
metadata:
  name: my-microvm-pool
  namespace: my-ns
  labels:
    workload: my-microvm   # optional; for workerSelector
spec:
  replicas: 2
  sandboxClass: microvm
  sandboxConfigName: my-microvm          # points at #1
  ateomImage: ko://github.com/agent-substrate/substrate/cmd/ateom-microvm
---
apiVersion: ate.dev/v1alpha1
kind: ActorTemplate
metadata:
  name: my-app
  namespace: my-ns
spec:
  sandboxClass: microvm                  # must match pool
  pauseImage: "registry.k8s.io/pause:3.10.2@sha256:..."  # as in demos
  containers:
  - name: app
    image: <your-workload-image>
    readyz:
      httpGet:
        path: /readyz   # whatever your app exposes
        port: 80
  workerSelector:                        # optional but usual
    matchLabels:
      workload: my-microvm
  snapshotsConfig:
    location: gs://${BUCKET_NAME}/my-app/
You'd then use the following to deploy an Actor via the Template that you created within an atespace.
kubectl ate create atespace demo   # if needed
kubectl ate create actor my-actor-1 -a demo --template my-ns/my-app
MicroVM Demo
Instead of creating your own, you can use the upstream MicroVM demo that's within the Agent Substrate repo.
- Verify the asset and deploy. The below does the following:
- **
assemble.sh**: Download/build the microVM runtime binaries foramd64intobin/microvm-assets/amd64/(cloud-hypervisor,virtiofsd, guest kernel, rootfs, config). Local only; nothing is applied to the cluster yet. - **
stage-to-gcs.sh**: Upload those binaries togs://$BUCKET_NAME/kata-assets/so atelet can fetch them when workers start. - **
VIRTIOFSD_SHA256=...**: Compute the sha256 of the stagedvirtiofsdbinary so the SandboxConfig pin matches what was uploaded. - **
sed ... counter-microvm.yaml.tmpl**: Substitute$BUCKET_NAMEand the virtiofsd hash into the demo template (namespace, SandboxConfig, WorkerPool, ActorTemplate). - **
ko apply**: Build/push anyko://images in that manifest (e.g.ateom-microvm, counter workload) to your registry and apply the rendered YAML to the cluster. The images need to be built/pushed for the microvm demo so the Actor can access them.
source .ate-dev-env.sh

OUT="$PWD/bin/microvm-assets/amd64"

VIRTIOFSD_SHA256="$(sha256sum "${OUT}/virtiofsd" | awk '{print $1}')"
echo "sha=$VIRTIOFSD_SHA256"

sed -e "s|\${BUCKET_NAME}|${BUCKET_NAME}|g" \
    -e "s|\${VIRTIOFSD_SHA256}|${VIRTIOFSD_SHA256}|g" \
    demos/counter/counter-microvm.yaml.tmpl \
| ./hack/run-tool.sh ko apply -f - -- --context="${KUBECTL_CONTEXT}"- Wait for the workload to be ready.
kubectl wait --for=condition=Ready \
actortemplate/counter-microvm -n ate-demo-counter-microvm --timeout=600s- Create the atespace and deploy the Actor.
kubectl ate create atespace demo

kubectl ate create actor my-counter-1 -a demo \
--template ate-demo-counter-microvm/counter-microvm- Port-forward the atenet-router so you can reach the Actor.
kubectl -n ate-system port-forward svc/atenet-router 8000:80- Hit the Actor.
curl -s -X POST \
  -H "Host: my-counter-1.demo.actors.resources.substrate.ate.dev" \
  http://localhost:8000/
You'll see an output similar to the one below:
hello from: 169.254.17.2 | preserved memory count: 1 | preserved file counter: 1Congrats! You have successfully deployed an Actor that uses hardware isolation utilizing MicroVM.
Wrapping Up
The AI world is fast-moving, as many of us can attest to. As a technology moves quickly and changes all of the time, it's incredibly difficult to secure it because there aren't specific standards to go off of to secure the workloads. As we've seen with the major AI providers over the past month, without proper security and isolation, Agents will never be able to truly be trusted within sandboxed environments. That's why hardware isolation is crucial to ensuring Agent success.
Comments ()