Rate Limiting LLM Token Usage With Agentgateway
AI started out as a cool chatbot that you could ask questions to and get responses in real-time, like an enhanced search engine. Fast forwarding a few years and it's changed the way engineers of all specialities are handling network traffic, security, observability, and deployments (quite literally the entire platform stack).
And one of the questions that pops up the most is cost. How can organizations understand how much Tokens will cost, how LLMs will be reached, and what limits can be set based on usage?
In this blog post, you'll learn not only why a new gateway (agentgateway) is needed for this, but also how to implement rate limiting for LLM calls.
Prerequisites
To follow along with this blog post in a hands-on fashion, you should have:
- A Kubernetes cluster (a local one is fine)
- An LLM API key (this blog uses Anthropic, but you can use various others like OpenAI or Gemini).
Why "Yet Another Gateway"?
This is an important question - why another Gateway? There are already several available. The majority of Gateways that are out now were built using Envoy Proxy, which is a microservice-based Proxy that has been around for a long time and is quite good (arguably the best proxy-based implementations made before AI). Envoy, however, was designed with stateless microservices in mind.
Going back to just a 2-3 years ago, no one thought that Kubernetes could run stateful workloads. It was designed in the beginning as a stateless orchestrator because that was the direction that microservices went in. That's why Envoy went in the same direction.
Envoy was created with stateless workloads in mind and with the traditional network traffic in mind (make decisions based on header information, which is typically known as the Request-Response Pattern). The problem with this approach is that it's not how agentic network traffic works.
Agent/LLM/MCP Traffic is stateful (not in the traditional sense - for AI, think of it as contextual and semantic).
The traffic is also based on what's in the body of a response, not the headers. Because of that, going the traditional Gateway route that's based on Envoy doesn't work.
When thinking about the "semantic" piece (aside from the contextual), this is how the data is interpreted. In a traditional (syntactic) sense, you ask a few questions in order and based on that information, you get a response from how the data is interpreted, which is typically almost like a if/else statement. It's a predefined pattern. With semantic reasoning, you're asking several questions and getting a response in a collected format. What that means is the LLM is looking at all of the questions and saying "Are all of these related?", and then you get a response based on how that decision is made. The way that this is done in the semantic sense is by converting the data to prompt embeddings (think vector, which is the way that LLMs understand the information being passed in - much like how a computer understands binary) and then it can understand "meaning".
Envoy works by thinking L4-L7.
TCP/IP → TLS → HTTP Headers → Route → Load Balance → BackendBut this process doesn't take into account the need to understand the semantic nature of LLMs.
Here's a great graph breakdown.
Installation & Configuration
Now that you have read a bit about why you need a new Gateway for Agentic traffic (especially stuff like rate limiting), let's learn how to install and configure agentgateway.
agentgateway, remember, is the data plane. Because it's the dataplane, you need a control plane (a control plane is like the brain of the operation) and that's where kgateway comes into play (it's an open-source gateway). In the next section when you deploy the Gateway, you'll see that the backend object uses the kgateway CRDs (hence the need for a control plane).
- Install the Kubernetes Gateway API, which is what kgateway uses for CRDs to handle objects like
GatewayandHTTPRoute.
kubectl apply -f https://github.com/kubernetes-sigs/gateway-api/releases/download/v1.4.0/standard-install.yaml- Install the kgateway CRDs.
helm upgrade -i --create-namespace --namespace kgateway-system --version v2.2.0-main \
kgateway-crds oci://cr.kgateway.dev/kgateway-dev/charts/kgateway-crds \
--set controller.image.pullPolicy=Always- Install kgateway. You'll see that agentgateway is enabled for the data plane.
helm upgrade -i --namespace kgateway-system --version v2.2.0-main kgateway oci://cr.kgateway.dev/kgateway-dev/charts/kgateway \
  --set gateway.aiExtension.enabled=true \
  --set agentgateway.enabled=true  \
--set controller.image.pullPolicy=Always- You can confirm that kgateway is running. However, you won't see any agentgateway Pods because you haven't deployed a Gateway yet, so only the control plane is running.
kubectl get pods -n kgateway-systemGateway Configuration
With kgateway installed as the Control Plane and agentgateway installed as the Data Plane, let's configure an Agent object and a route so we can reach out to an LLM.
- Store the API key as an environment variable.
export ANTHROPIC_API_KEY=- Save the API key as a Kubernetes Secret.
kubectl apply -f- <<EOF
apiVersion: v1
kind: Secret
metadata:
  name: anthropic-secret
  namespace: kgateway-system
  labels:
    app: agentgateway
type: Opaque
stringData:
  Authorization: $ANTHROPIC_API_KEY
EOF- Create a Gateway that uses agentgateway as the data plane and allows traffic from all namespaces over port 8080.
kubectl apply -f- <<EOF
kind: Gateway
apiVersion: gateway.networking.k8s.io/v1
metadata:
  name: agentgateway
  namespace: kgateway-system
  labels:
    app: agentgateway
spec:
  gatewayClassName: agentgateway
  listeners:
  - protocol: HTTP
    port: 8080
    name: http
    allowedRoutes:
      namespaces:
        from: All
EOF- Create a backend object that defines the destination that you want kgateway to route to. In this case, it's Claude (the LLM).
kubectl apply -f- <<EOF
apiVersion: gateway.kgateway.dev/v1alpha1
kind: Backend
metadata:
  labels:
    app: agentgateway
  name: anthropic
  namespace: kgateway-system
spec:
  type: AI
  ai:
    llm:
        anthropic:
          authToken:
            kind: SecretRef
            secretRef:
              name: anthropic-secret
          model: "claude-3-5-haiku-latest"
EOF- You can now see that the backend and the data plane Pod is running.
kubectl get backend -n kgateway-system
kubectl get pods -n kgateway-system- Create a route that you can use to
curlthe endpoint to test the LLM connectivity.
kubectl apply -f- <<EOF
apiVersion: gateway.networking.k8s.io/v1
kind: HTTPRoute
metadata:
  name: claude
  namespace: kgateway-system
  labels:
    app: agentgateway
spec:
  parentRefs:
    - name: agentgateway
      namespace: kgateway-system
  rules:
  - matches:
    - path:
        type: PathPrefix
        value: /anthropic
    filters:
    - type: URLRewrite
      urlRewrite:
        path:
          type: ReplaceFullPath
          replaceFullPath: /v1/chat/completions
    backendRefs:
    - name: anthropic
      namespace: kgateway-system
      group: gateway.kgateway.dev
      kind: Backend
EOF- Retrieve the address of the Gateway and store it in an environment variable so you can use it later for the
curl.
export INGRESS_GW_ADDRESS=$(kubectl get svc -n kgateway-system agentgateway -o jsonpath="{.status.loadBalancer.ingress[0]['hostname','ip']}")
echo $INGRESS_GW_ADDRESS- Test the LLM connectivity.
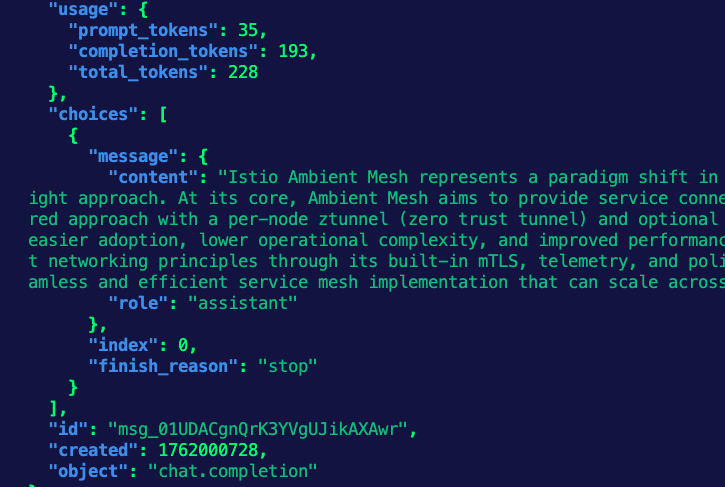
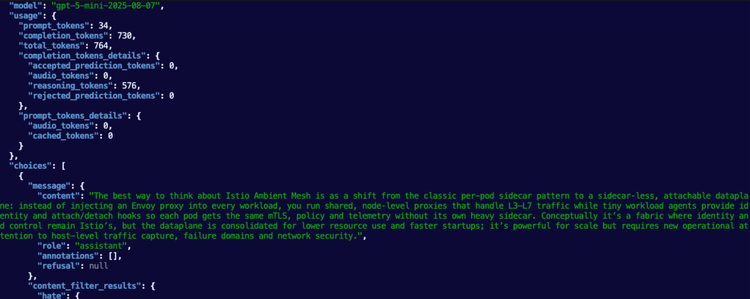
curl "$INGRESS_GW_ADDRESS:8080/anthropic" -v \ -H content-type:application/json -H x-api-key:$ANTHROPIC_API_KEY -H "anthropic-version: 2023-06-01" -d '{
  "model": "claude-sonnet-4-5",
  "messages": [
    {
      "role": "system",
      "content": "You are a skilled cloud-native network engineer."
    },
    {
      "role": "user",
      "content": "Write me a paragraph containing the best way to think about Istio Ambient Mesh"
    }
  ]
}' | jq
You should see an output similar to the below:
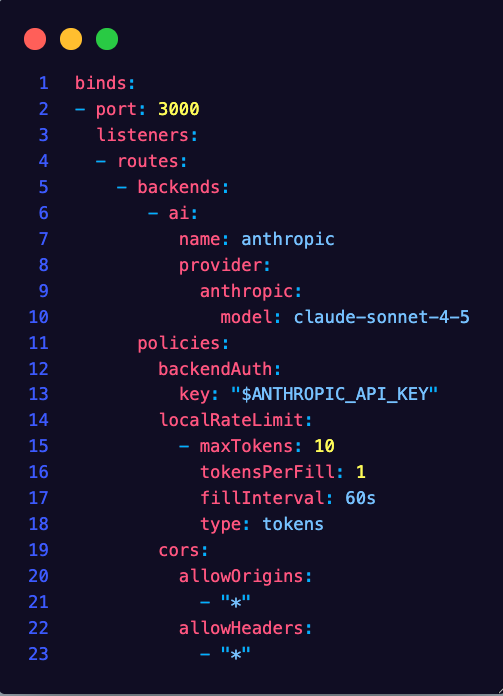
Rate Limiting
With the Gateway and route properly configured, let's create a rate limit via a traffic policy. This is going to limit the max tokens to be used as 1 and it resets every 100 seconds.
kubectl apply -f- <<EOF
apiVersion: gateway.kgateway.dev/v1alpha1
kind: TrafficPolicy
metadata:
  name: anthropic-ratelimit
  namespace: kgateway-system
spec:
  targetRefs:
    - group: gateway.networking.k8s.io
      kind: HTTPRoute
      name: claude
  rateLimit:
    local:
      tokenBucket:
        maxTokens: 1
        tokensPerFill: 1
        fillInterval: 100s
EOF
Run the curl twice, and the second time you run it, you'll see the below, which indicates that there were too many requests sent based on the limit.
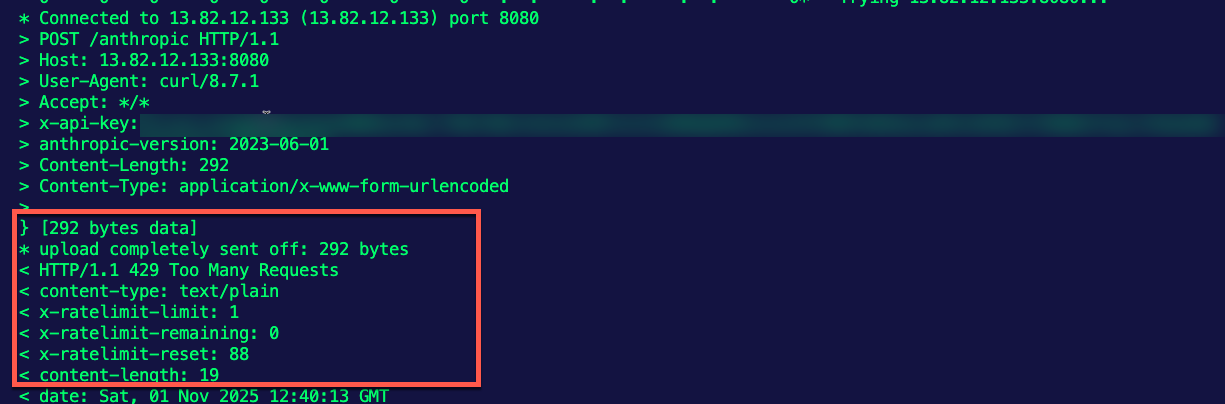
Congrats! You've successfully set up rate limiting for LLM connectivity.
Conclusion
Just about every conversation around AI in the enterprise right now comes down to two things - security and cost. When it comes to cost, the primary factors that come into play are "How much is using an Agent going to cost me?" and "How can I control how many Tokens are used and what LLMs are used?". That's why rate limiting and agentgateway are implemented.

Comments ()