How Agentgateway Makes LLM & MCP Token Spend Visible
Tokens turn into dollars, and the tokens are expanded upon in many different ways. Input tokens, output tokens, agent context racking up tokens due to ingesting MCP Server tools, and token output increasing based on the Model you're using are all factors when thinking about what agentic workflow and harness you want to implement.
In this blog post, you'll learn how to see it and manage it all in one location with agentgateway.
Prerequisites
To follow along with this blog post in a hands-on fashion, you will need:
- The Docker engine. It can be on a server or even on your local laptop/desktop using Docker Desktop.
Your Config File
The config file, which is a yaml extension for agentgateway oss standalone, is the full configuration for what your agentgateway environment looks like. It contains everything from what providers you're using to what CORS rules and policies are configured.
In this blog post, you'll see that multiple LLM providers are used. However, you can just use one if you do not have multiple LLM providers.
The multi-provider YAML configuration is below:
llm:
port: 3000
providers:
- name: anthropic
provider: anthropic
params:
apiKey:
file: /etc/agentgateway/secrets/anthropic-api-key
- name: xai
provider: xai
params:
apiKey:
file: /etc/agentgateway/secrets/xai-api-key
- name: gemini
provider: gemini
params:
apiKey:
file: /etc/agentgateway/secrets/gemini-api-key
- name: openai
provider: openai
params:
apiKey:
file: /etc/agentgateway/secrets/openai-api-key
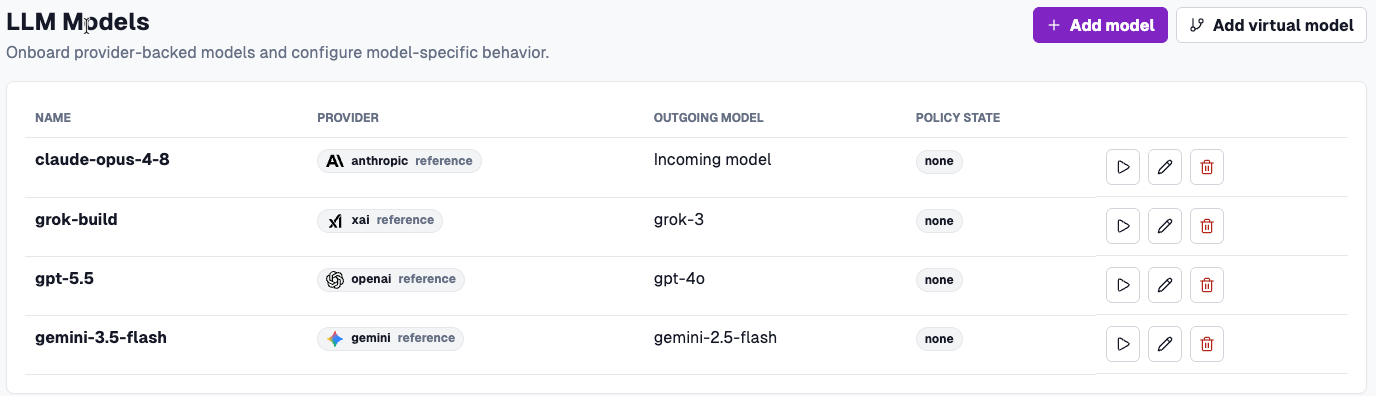
models:
- name: claude-opus-4-8
visibility: public
provider:
reference: anthropic
- name: grok-build
visibility: public
provider:
reference: xai
params:
model: grok-3
- name: gpt-5.5
visibility: public
provider:
reference: openai
params:
model: gpt-4o
- name: gemini-3.5-flash
visibility: public
provider:
reference: gemini
params:
model: gemini-2.5-flash
policies:
cors:
allowOrigins:
- '*'
- http://localhost:15000
allowHeaders:
- '*'
allowMethods:
- '*'
- GET
- POST
mcp:
port: 3001
targets:
- name: everything
mcp:
host: mcp-everything
port: 3001
path: /mcp
policies:
cors:
allowOrigins:
- http://localhost:15000
allowHeaders:
- '*'
allowMethods:
- GET
- POST
exposeHeaders:
- Mcp-Session-Id
config:
database:
url: sqlite:///work/requests.db
modelCatalog:
- file: base-costs.json
binds: []
If you'd prefer to use only one provider, here's an example with Anthropic (feel free to swap it out with whichever provider works best for you).
llm:
  port: 3000
  providers:
  - name: anthropic
    provider: anthropic
    params:
      apiKey:
        file: /etc/agentgateway/secrets/anthropic-api-key
  models:
  - name: claude-opus-4-8
    visibility: public
    provider:
      reference: anthropic
  policies:
    cors:
      allowOrigins:
      - '*'
      - http://localhost:15000
      allowHeaders:
      - '*'
      allowMethods:
      - '*'
      - GET
      - POST
mcp:
  port: 3001
  targets:
  - name: everything
    mcp:
      host: mcp-everything
      port: 3001
      path: /mcp
  policies:
    cors:
      allowOrigins:
      - http://localhost:15000
      allowHeaders:
      - '*'
      allowMethods:
      - GET
      - POST
      exposeHeaders:
      - Mcp-Session-Id
config:
  database:
    url: sqlite:///work/requests.db
  modelCatalog:
  - file: base-costs.json
binds: []
Save the file as config.yaml in a directory where you can run commands from.
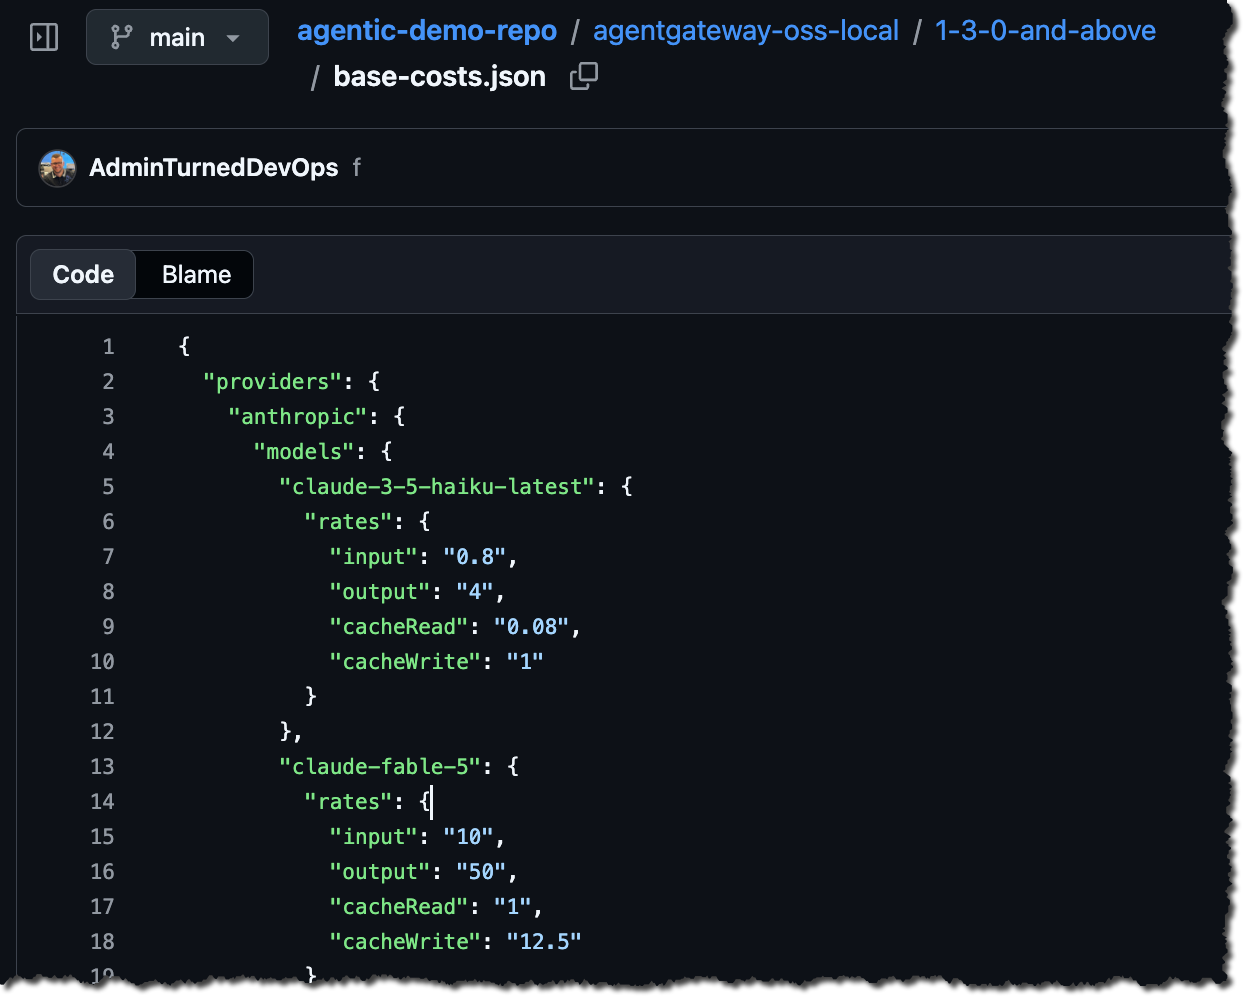
You'll also notice that there's a modelCatalog parameter pointing to a JSON file. This contains current rates in terms of all of the providers input tokens, output tokens, and caches. You can copy the one used in this blog post from here. Save it as base-cost.json.
Installation & Configuration
With the configuration file and base cost JSON saved, it's time to run agentgateway in a container to see all of the token and cost benefits that you get from a visualization perspective.
- Add your API key(s) from a secret. This is used so agentgateway can properly authenticate to your provider.
mkdir -p secrets
printf '%s' "sk-ant-..." > secrets/anthropic-api-key
For a multi-provider config file, it'll look something like:
printf '%s' "sk-ant-..." > secrets/anthropic-api-key
printf '%s' "xai-..."   > secrets/xai-api-key
printf '%s' "AIza..."   > secrets/gemini-api-key
printf '%s' "sk-proj-..." > secrets/openai-api-key- Create a shared Docker network because the gateway and MCP server are separate containers and need to resolve each other by name.
docker network create agw-net- Start the MCP Server.
docker run -d --name mcp-everything --network agw-net \
node:23-slim npx -y @modelcontextprotocol/server-everything streamableHttp- Start the Gateway.
Single provider command:
docker run -d --name agw-v130 --network agw-net \
  -p 15000:15000 -p 3000:3000 -p 3001:3001 \
  -e ADMIN_ADDR=0.0.0.0:15000 \
  -w /work \
  -v "$PWD:/work" \
  -v "$PWD/secrets:/etc/agentgateway/secrets:ro" \
  ghcr.io/agentgateway/agentgateway:v1.3.0 -f /work/v130-example-config.yaml
Multi-provider command:
docker run -d --name agw-v130 --network agw-net \
-p 15000:15000 -p 3000:3000 -p 3001:3001 \
-e ADMIN_ADDR=0.0.0.0:15000 \
-w /work \
-v "$PWD:/work" \
-v "$PWD/secrets:/etc/agentgateway/secrets:ro" \
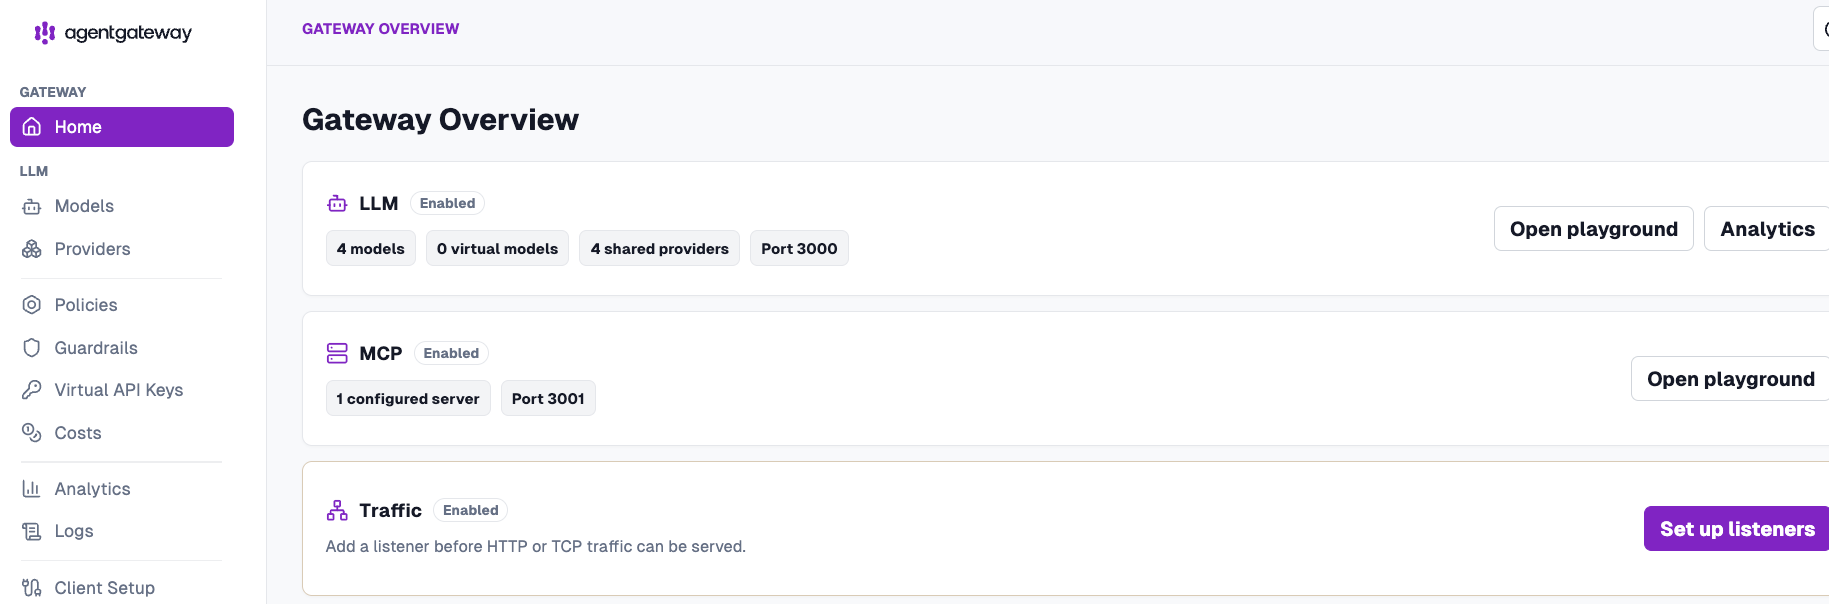
ghcr.io/agentgateway/agentgateway:v1.3.0 -f /work/multi-prov.yamlYou should now be able to see agentgateway up and running.
Next, let's test out the gateway and MCP Server.
Testing Agentgateway
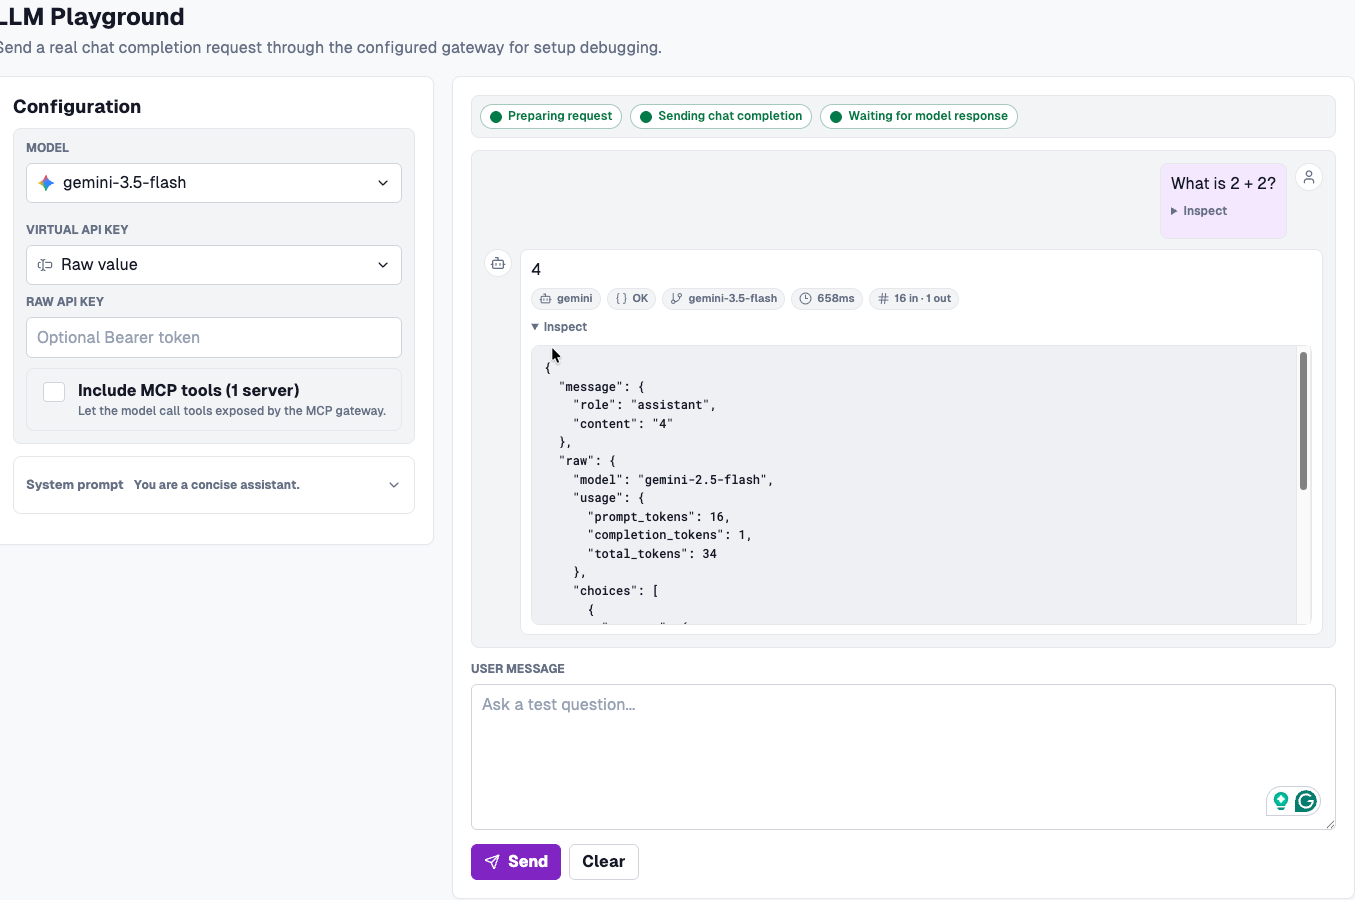
With agentgateway deployed, you can now interact with your LLM(s) and MCP Server directly from the playground.
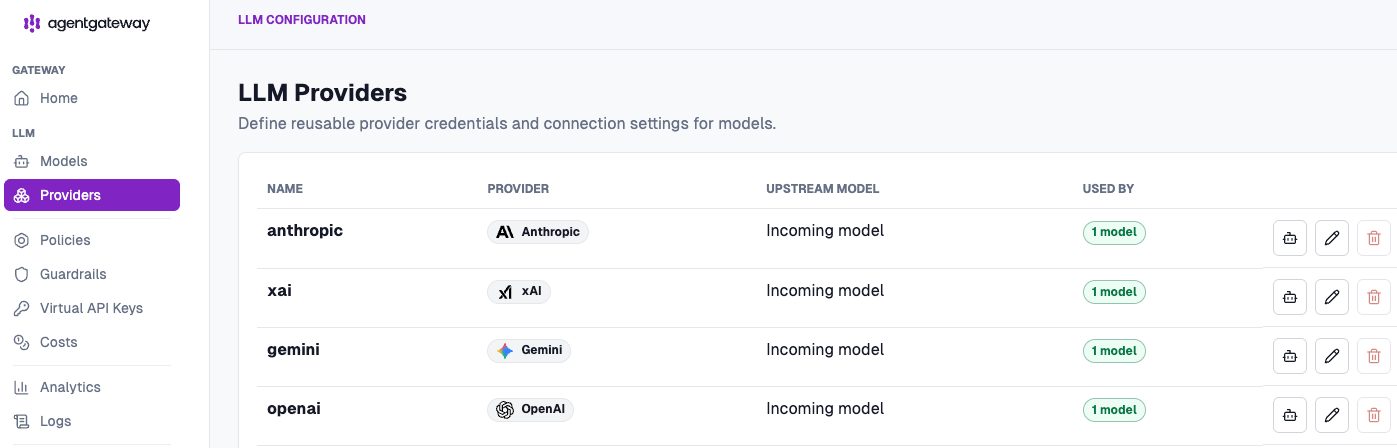
- Under the agentgateway Providers tab, you can see all available LLM providers.
- If you click the Models tab, you'll see a play button/icon on the right. Click it and you will be within the Playground.
- You can then prompt your LLM anything you'd like.
And you can do the same within the MCP Playground.
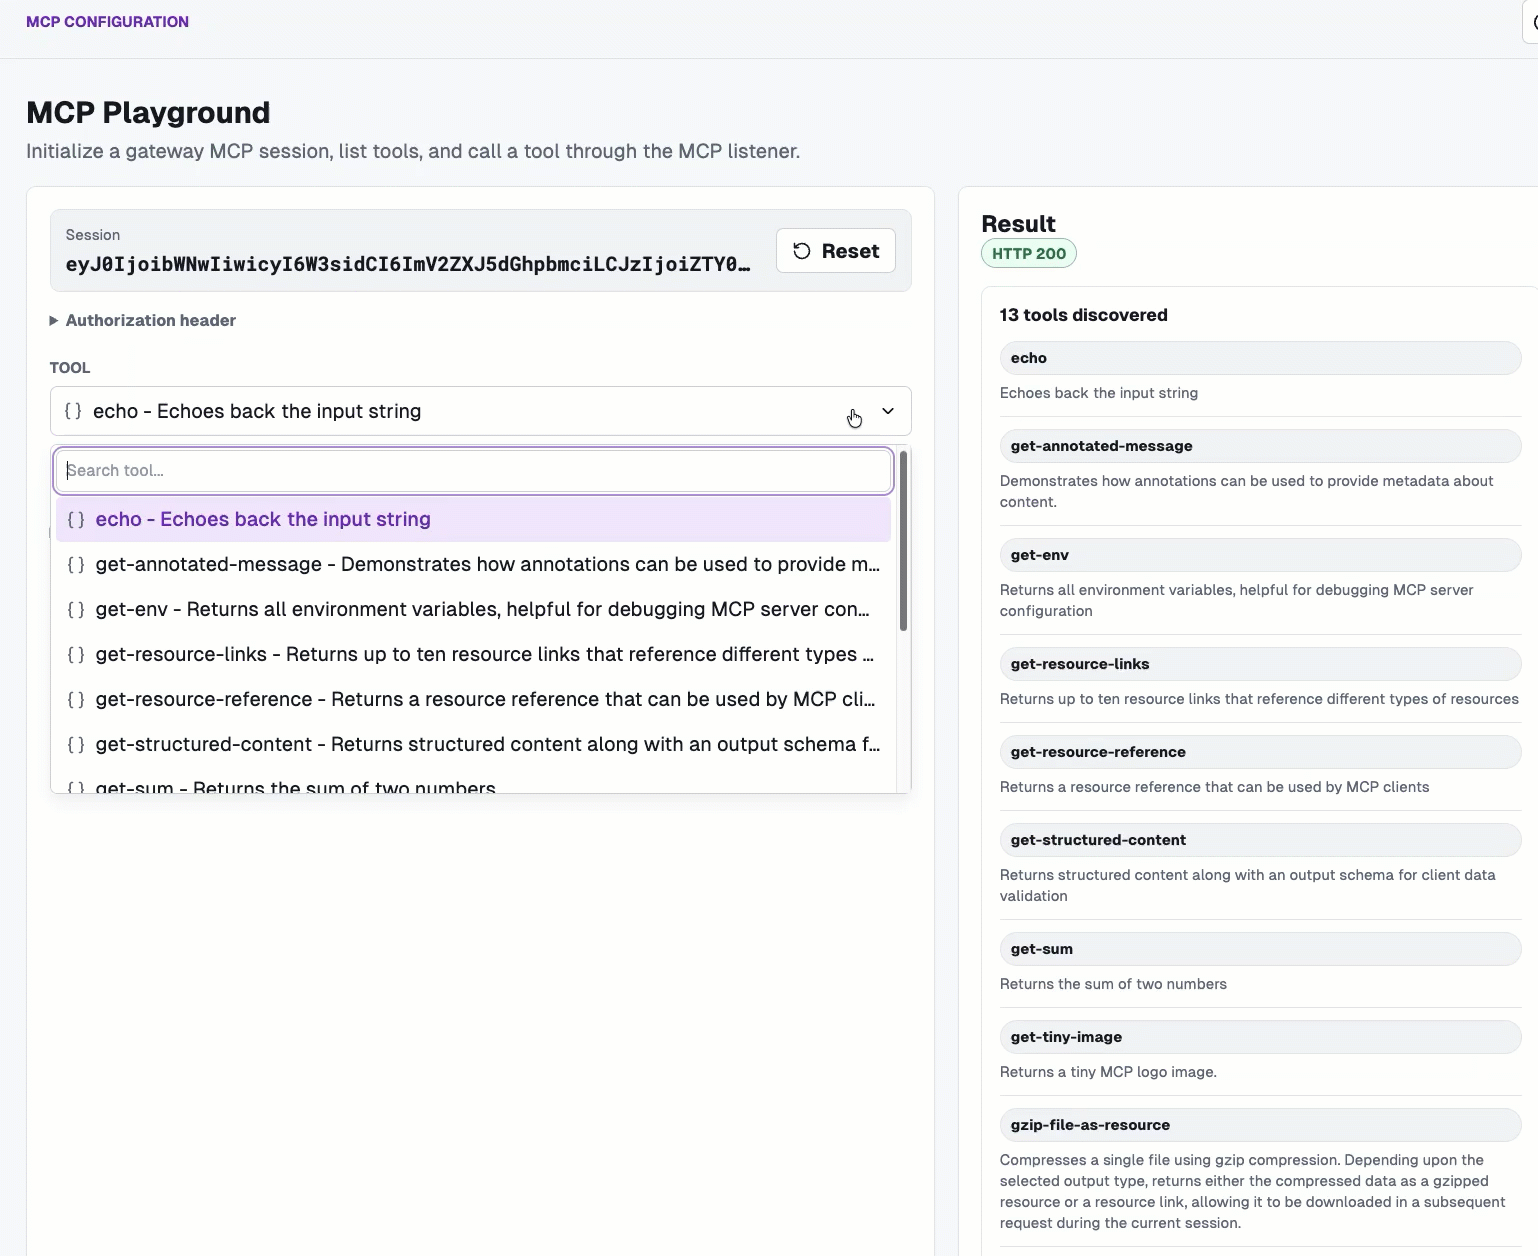
What you did was, of course, test out agentgateway to ensure that it worked as expected, but what you also did was generate traffic. That means input tokens, output tokens, and cost for said tokens. Let's see what that looks like within the agentgateway Analytics and Logs dashboards.
Cost Mgmt in Agentgateway
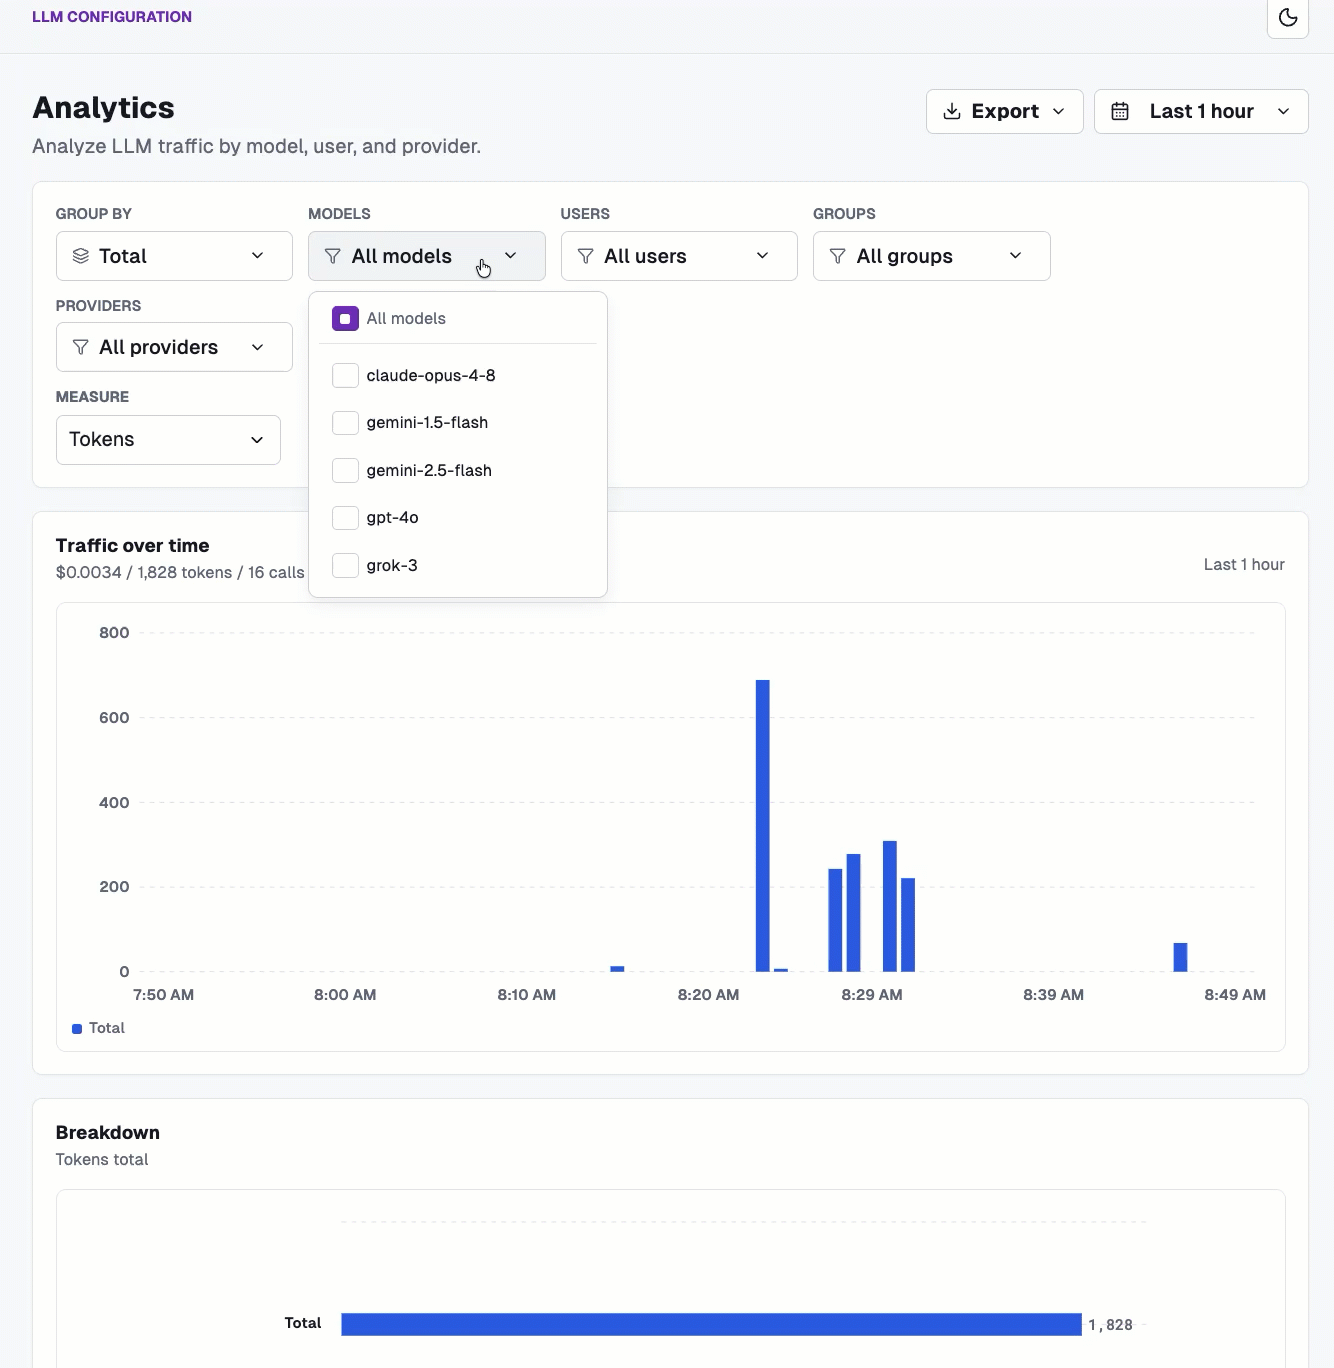
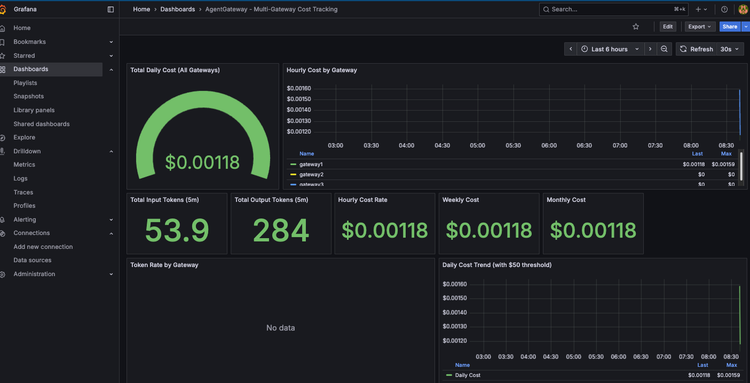
With traffic now flowing through your gateway to hit both an MCP Server and an LLM provider (or multiple LLM providers), you can see the analytics of all runs/traffic over time.
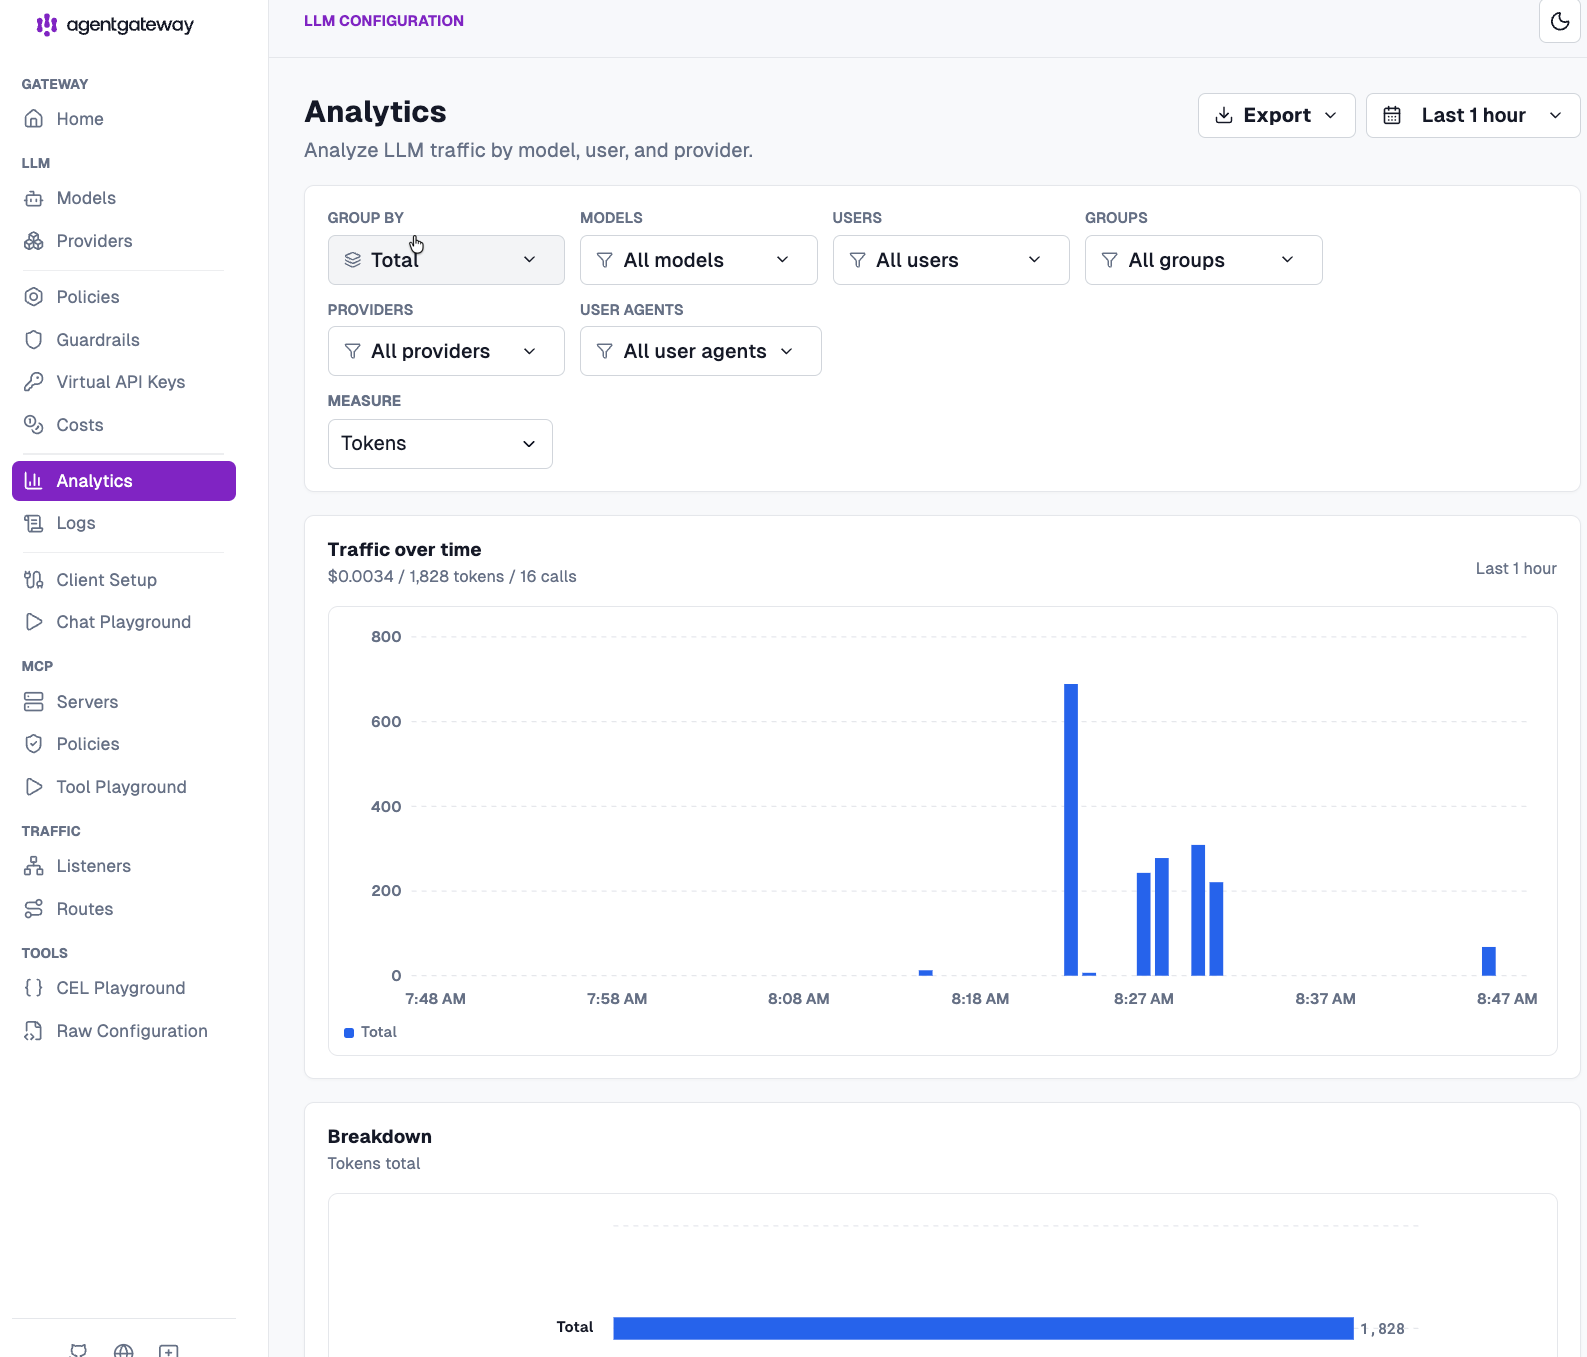
And you can break it down based on provider, model, users, groups, and agents, along with measure on tokens and cost.
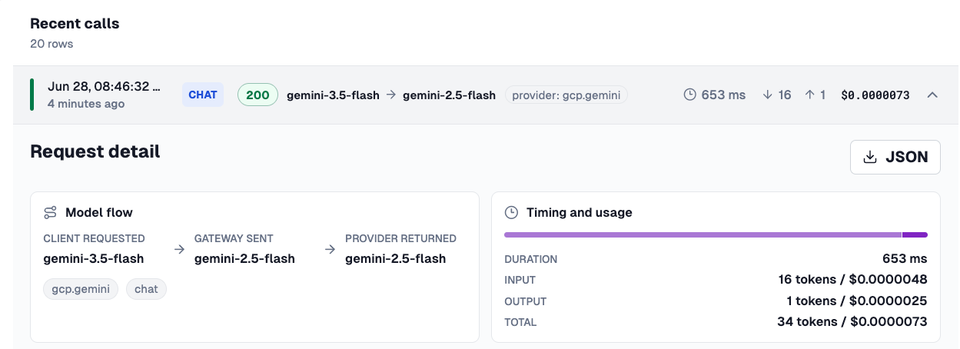
Within the Logs dashboard, you can see how long a call took, how many tokens it cost, and the actual dollar figure.
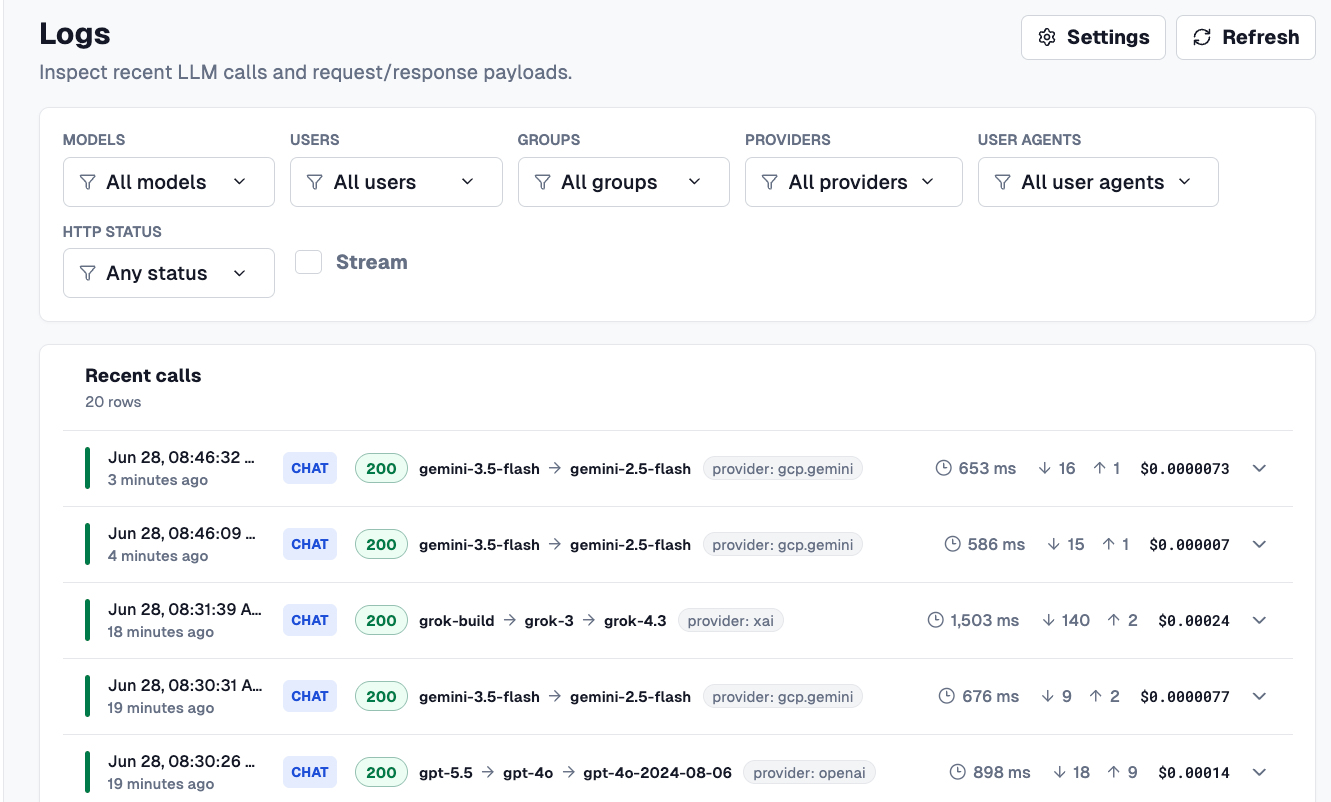

Agentgateway covers off everything you'd need from a cost and management perspective - tokens in, tokens out, how much those tokens cost in cents/dollars, the model flow, and the performance of the call via your Agent.

Comments ()