Implementing Istio From Start To Finish
If you’re implementing a Service Mesh in your Kubernetes environment, chances are it’s for one of the following:
- Encryption for service-to-service communication.
- The ability to see network traffic and performance.
- Network resilience and scale (blue/green, circuit breakers, fault injection, retires, AB testing)
The service Mesh you see in an environment will differ based on organization, but there’s a high likelihood that you’ll see Istio implemented. Even if Istio is not implemented in the environment you’re working in or going to work in, once you know one Service Mesh, you can confidently figure out the rest.
In this blog post, you’ll learn how to not only install Istio, but configure mTLS and ensure that the Istio Sidecar is injected into Pods.
Installation
The first step to getting started with a Service Mesh is the installation. There are two primary ways to install Istio:
- Helm
- The Istio CTL
- First, add the Istio repository.
helm repo add istio https://istio-release.storage.googleapis.com/charts
- Next, install the Istio base configurations. The base configuration is a set of CRDs and are separate from the Istio installation itself.
helm install istio-base istio/base -n istio-system --create-namespace
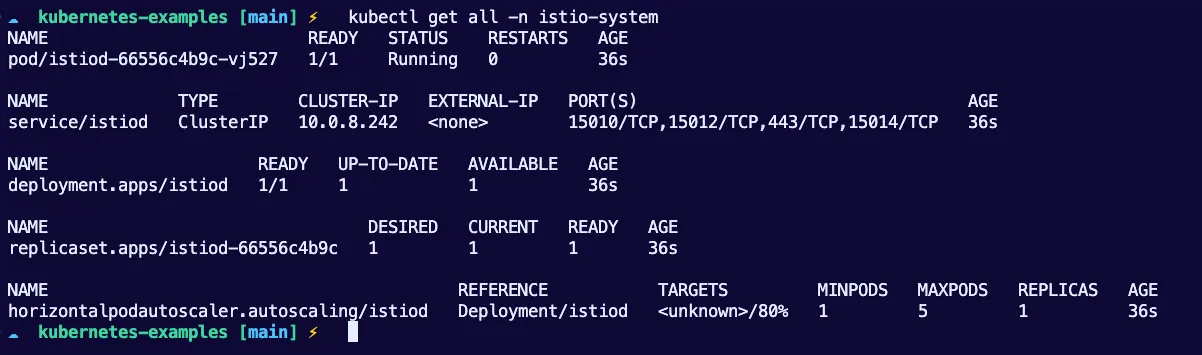
- Lastly, install the Istio workloads. You’ll see the Pod and Service in the
istio-systemNamespace once complete.
helm install istiod istio/istiod -n istio-system
Now that Istio is installed, let’s see a few different ways to ensure that the Istio Sidecar container is implemented in the Pods that need Istio.
Istio Injection (Option 1: Namespace)
When you install Istio like you did in the previous section, you're installing what many call the "Control Plane" or "Management Server" (not to be confused with the Kubernetes Control Plane). The "Control Plane" in the sense of Istio is like the brain of the operation. When you write Manifests that contain things like routing rules via Istio, you're applying those Manifests via the cluster running the Istio Control Plane, and that Control Plane is sending the instructions down to the Data Plane. The Data Plane is the Worker Nodes where the Pods are running that need said instructions from Istio.
The two ways to properly ensure that the Data Plane (Pods running that need the Istio instruction) get the instruction are by using either:
- Ambient Mesh
- Sidecar Injection
Let's go the Sidecar Injection route for the purposes of this blog post.
The first method of injecting the Istio Sidecar container is via a Namespace label. With the istio-injection Namespace Label, all Pods that are deployed after the Label is set will retrieve the Sidecar container.
Remember - Pods that are already deployed will not receive the Sidecar container. For example, if I have two Pods already running and then create the Istio Injection Label, the Pods won’t get the Istio Sidecar. You’ll have to remove/restart the Pods and have them redeploy via self-healing (the ReplicaSet Controller). Once the Pods redeploy, they’ll obtain the Istio Sidecar.
As an example, you can add the Injection label on the default Namespace.
kubectl label namespace default istio-injection=enabled --overwrite
You can then check and confirm that the Label was added successfully.
kubectl get namespace -L istio-injection
If you want to remove the Label, run the following:
kubectl label namespaces default istio-injection-
Ensure that you restart the Pods; otherwise, you will not see the sidecar container running.
Option 2: Deployment YAML Injection
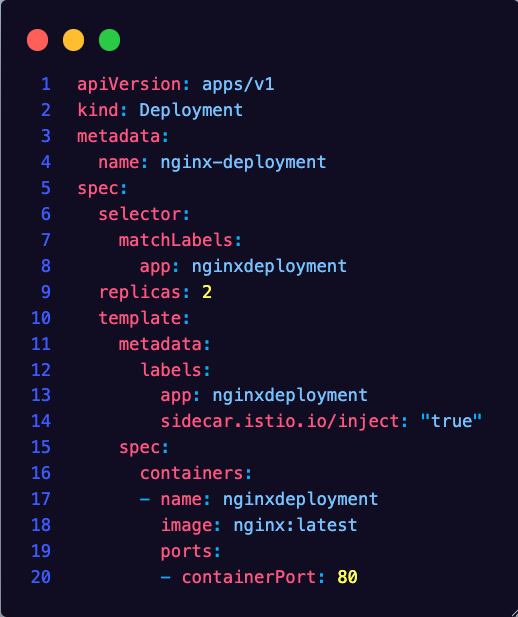
A good way to ensure that the Istio Sidecar is installed as soon as a Pod is deployed is by adding the inject label into the Kubernetes Manifest.
For example, the below Manifest has a label that is set to true for injecting the Istio sidecar.
kubectl apply -f - <<EOF
apiVersion: apps/v1
kind: Deployment
metadata:
  name: nginx-deployment
spec:
  selector:
    matchLabels:
      app: nginxdeployment
  replicas: 2
  template:
    metadata:
      labels:
        app: nginxdeployment
        sidecar.istio.io/inject: "true"
    spec:
      containers:
      - name: nginxdeployment
        image: nginx:latest
        ports:
        - containerPort: 80
EOF
Option 3: Istioctl Injection
The third option you can use to inject Istio is via the Istio CLI, which is Istio's Command-Line Interface/Tool.
- First, install the Istio CLI.
curl -L https://istio.io/downloadIstio | sh -
- Next, use the following command to inject the Sidecar into a Deployment. For example, the Deployment that Istio is injecting the Sidecar into is from the
nginx.yamlDeployment Manifest. You’ll need to change that name to whatever name your Kubernetes Manifest is.
istioctl kube-inject -f nginx.yaml | kubectl apply -f -
If you take a look at the Pods running within that Deployment, you’ll notice that the kube-inject command deletes the Pods that are currently running and new Pods come up with the Sidecar Container.
Enabling mTLS
As you learned about in the opening of this blog post, there are three primary reasons engineers choose to go with a Service Mesh option. One of the most popular is for Mutual TLS, which is to encrypt traffic between Kubernetes Services.
Istio, by default, enables mTLS, but it works in permissive mode. The three modes are:
- Permissive: Accepts both mTLS and plain-text traffic.
- Strict: mTLS traffic only.
- Disabled: mTLS is turned off
The way that you enable strict mode is by using the PeerAuthentication object/kind in a Kubernetes Manifest with the Istio CRDs.
As an example, the configuration below adds mTLS to the default Namespace, as it’s not specifying a Namespace.
kubectl apply -n default -f - <<EOF
apiVersion: security.istio.io/v1beta1
kind: PeerAuthentication
metadata:
  name: "default"
spec:
  mtls:
    mode: STRICT
EOF
Closing Thoughts
Understanding traffic within your cluster is the make or break between understanding the performance of your environment and getting an angry call from users. It also helps to get to the bottom of errors/warnings, potential malicious attacks, and misconfigurations.

Comments ()