Istio Ambient Mesh: The Sidecarless Methodology

As with the majority of architecture, there's a "client/server" model or a "control plane/data plane" model. We see it in our Kubernetes clusters and in AI tooling. The good news is that when we progress through these models of architecture, sometimes things actually get less complex.
In this blog post, you'll learn about what sidecars are, how to implement a Service Mesh without sidecars, and a few different methods of installation.
Server Mesh Origins
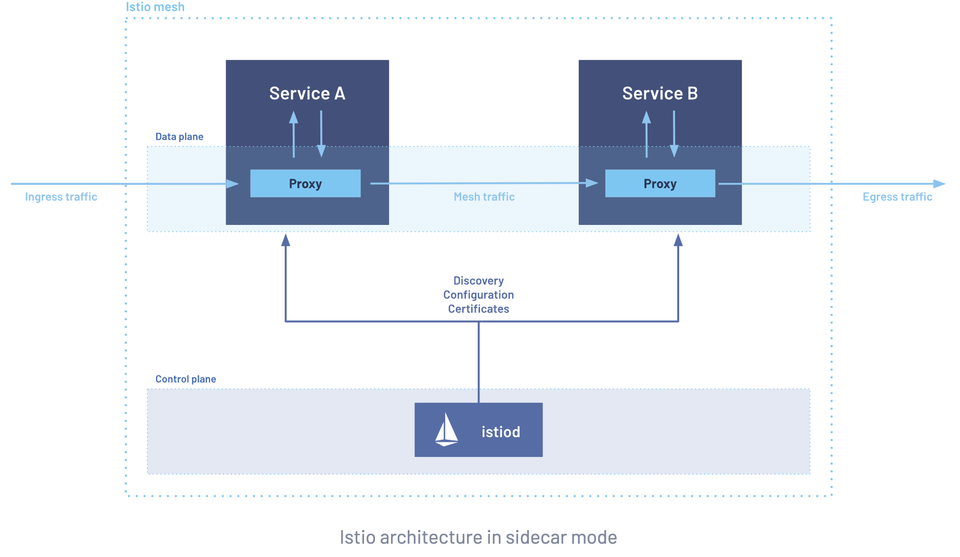
Originally, a Service Mesh was implemented in a control plane/data plane or management server/worker server architecture. Similar to how a lot of stacks in a client/server architecture work, you have the “brains of the operation”, which is where Istiod is installed, and the nodes that are running your application stack, which receive policies from the “brain of the operation” or Istiod.
The way it would (and still does) work is you’d send a policy or a specific needed configuration for something like HTTP routing or canary deployments to Istiod and then Istiod would send it to the nodes that are receiving the policy, often called the data plane. At this point, the data plane is responsible for distributing the policies or specific configs to the Services that need them. This is done via Envoy, which is the data plane proxy.
Although Envoy is great and will continue to be used, the sidecar model increases complexity and it's another configuration that we need to manage.
That’s where Ambient Mesh comes into play, which you'll learn about in an upcoming section.
What Are Sidecars
When you install Istio (without an Ingress), there are two steps:
- Install the base (CRDs/k8s API extension)
- Install Istio itself (the brains of the operation/Control Plane)
When you do this, you are able to manage Services with Istio, including the ability to handle traffic, overall network observability, and encryption. You can write a Kubernetes Manifest for things like HTTP routing and weights (e.g - 80% traffic on v1 and 20% on v2). The problem is that although you can write these configs, your workloads don't know they exist.
That's where sidecar proxies come into play.
Sidecar proxies are the data plane. Much like how the Kubernetes cluster has Control Planes and Worker Nodes, Istio (and all other Service Meshes) have the same type of relationship. Where the Istio workload is installed is the "brains of the operation". It's where you send the configs you want (traffic routing, weights, mTLS, etc.). Then, the data plane (the sidecar proxies) accepts those configurations and routes them to the appropriate application. The reason that the sidecar proxy is able to do that is because the sidecar proxy is running as a container within the Pod that your application is also running in.
The sidecar proxy is Envoy, which is the most popular cloud-native proxy implementation in today's world due to its dynamic configuration and load balancing capabilities, which is very important in a world where Kubernetes Services are load balancing traffic between Kubernetes Pods.
Implementation Without Sidecars
Although Envoy proxy and the overall sidecar implementation for Service Mesh works great, as with all great implementations, there are also downsides. That's where Ambient Mesh can come in and help.
With Ambient, you have a shared, per Worker Node Ztunnel instance/component and an optional per-Namespace Waypoint Proxy. A Waypoint Proxy is essentially "shared sidecars". They are the same as a sidecar proxy in terms of functionality, except there are fewer of them deployed. With a sidecar, it’s a container within each Pod that needs service mesh configs. With a Waypoint, it’s in a namespace for all Pods within that namespace.
From a functionality perspective, it looks almost identical to sidecars:
- Traffic routing
- Load balancing
- Security policies (like mTLS)
- Traffic management (retries, circuit breaking)
And it uses the same underlying Envoy Proxy technology.
Here's what to keep in mind - one sidecar (Envoy Proxy) per Pod vs one Waypoint proxy per Namespace. It's a much simpler configuration to manage.
Let's talk about a few key aspects of Ambient that are beneficial for every environment.
The first is from a performance perspective. Sidecars take up CPU and memory, and in larger environments, this could be a concern from a performance optimization perspective. The second pro to removing the sidecar is that it's one less implementation detail you have to worry about. Although Envoy works great, there will, of course, be times just like with any other implementation, when you'll have to troubleshoot, upgrade, and fix the implementation. The third is that Sidecars require iptables rules or another method of network (firewall) rules to ingest the network traffic. With Ambient Mesh, all of the traffic occurs at the infrastructure level, which reduces the networking complexity of said network rules.
With the above being said, these may not be concerns for you or your organization. If you have a smaller environment and you like the Envoy proxy implementation, that's totally fine. This isn't a "remove all of your sidecars immediately" blog post, as that wouldn't be realistic for everyone. Think of Ambient Mesh like the next iteration in Service Mesh management. It's not that the "old way" is incredibly negative, but you should definitely start thinking about the new way, potentially for your next Kubernetes Networking project.
Ztunnel vs Waypoint Proxies
Although I made a callout in the section above, let's briefly go over some examples of Ztunnel and Waypoint.
Ztunnel (L4)
- mTLS encryption
- Network policies
- Traffic capture
- Traffic routing
Waypoint (L7)
- HTTP routing rules
- Traffic splitting/weights (think Canary deployments)
Implementation Option 1: Istioctl
Now that you know a bit about the "why" behind Ambient Mesh and some background in sidecar proxies, let's take the next two sections to talk about how to implement Ambient Mesh. Luckily, it's not all that different than how you're installing Istio now.
The first method is the imperative/CLI-based configuration with istioctl, the CLI for Istio.
- Install the
istioctl.
curl -L https://istio.io/downloadIstio | sh -
cd istio-1.27.0
export PATH=$PWD/bin:$PATH- Ensure that it was installed as expected.
istioctl version- Install Istio with the Ambient Mesh profile set.
istioctl install --set profile=ambient --skip-confirmationThat's it! Luckily, the installation with istiocto is pretty straightforward. However, in production, you may want a bit more management over the package.
Implementation Option 2: Helm
Because the Envoy sidecar proxy is being removed, there needs to be a way for the traffic that the proxy would handle to reach its destination(s). This isn't a job that the base installation of Istio is taking over, and it shouldn't (separation of concerns). With Ambient Mesh, the Kubernetes Gateway API is used as the primary method for configuring Waypoints, which are specialized proxies that handle L7 traffic for your Kubernetes Services within the Service Mesh
- First, install the Istio base configuration and ensure the Namespace gets created for
istio-system.
helm install istio-base istio/base -n istio-system --create-namespace --wait- Next, pull down the configurations (CRD) for the Kubernetes Gateway API.
kubectl get crd gateways.gateway.networking.k8s.io &> /dev/null || \
kubectl apply -f https://github.com/kubernetes-sigs/gateway-api/releases/download/v1.3.0/standard-install.yaml- The third step, specifically for Istio, is to install the Istio config and specify the Ambient method.
helm install istiod istio/istiod --namespace istio-system --set profile=ambient --wait
Now that Istio and the Kubernetes Gateway API CRDs are installed, there will be two extra implementation steps:
- The
istio-cni, which is for detecting Pods that belong to the Ambient Mesh (remember, no more sidecar containers to do this for you). - Ztunnel, which is used for the node proxy component that sits on the Ambient Mesh data plane (instead of using Envoy Proxy via sidecars).
- Install the Istio CNI.
helm install istio-cni istio/cni -n istio-system --set profile=ambient --wait- Install Ztunnel
helm install ztunnel istio/ztunnel -n istio-system --waitYour implementation is now ready to go and managed by Helm!
Conclusion
If you're new to Service Mesh or thinking about implementing it for the first time, take a hard look at Ambient Mesh. There's currently no true negative/downside aside from:
- It's semi-new, so there may not be a lot of guides out there around it (hopefully this one helps though).
- It requires a few more steps for the installation, which you saw in the previous section Implemention Option 2: Helm, but nothing that's over the top in terms of taking hours to do (it adds an extra 2-3 minutes, if that).
If you've implemented Service Mesh already, think about Ambient for your next big networking project, but don't feel like you have to do it tomorrow or everything is going to go up in flames. You have some time left.


Comments ()