Running OpenClaw on Kubernetes

The "new and exciting" way of interacting with Agents is the personal assistant method (from iMessage, WhatsApp, or whatever else) and this interest is taking the industry by storm. OpenAI "bought" OpenClaw, Nvidia is investing in its own version of personal assistants, and several other organizations are trying to figure out how to implement this in production.
The question is - does it run on your infra?
In this blog post, you'll learn how to implement OpenClaw in Kubernetes and observe/secure it with agentgateway.
Prerequisites
To follow along with this blog post from a hands-on perspective, you will need the following:
- A Kubernetes cluster running with at least 2 vCPUs and 2–4 GB RAM, though 8 GB RAM and higher are recommended for smoother performance.
- agentgateway installed, which you can find here.
Containerization Setup
There are two different ways that you can use OpenClaw in a containerized fashion:
- Build your own container image. There's a Dockerfile in the OpenClaw repo which you can find here.
- Use a container image that was already built. There is an official Alpine image which you can find here.
The first option will, of course, be the most secure, as you can build the container image yourself and ensure you know what is within the Dockerfile. In air-gapped environments, this would be the ideal setup.
Agentgateway Config To Observe and Secure Agentic Traffic
Once the containerization setup is complete, you can begin the agentgateway setup.
- Create a Gateway using the Kubernetes Gateway API CRDs and the agentgateway Gateway class.
kubectl apply -f- <<EOF
kind: Gateway
apiVersion: gateway.networking.k8s.io/v1
metadata:
  name: agentgateway-oc
  namespace: agentgateway-system
  labels:
    app: agentgateway
spec:
  gatewayClassName: agentgateway
  listeners:
  - protocol: HTTP
    port: 8081
    name: http
    allowedRoutes:
      namespaces:
        from: All
EOF- Set an env variable with an Anthropic API key
export ANTHROPIC_API_KEY=- Create a Kubernetes Secret with the API key.
kubectl apply -f- <<EOF
apiVersion: v1
kind: Secret
metadata:
  name: anthropic-secret
  namespace: agentgateway-system
  labels:
    app: agentgateway-oc
type: Opaque
stringData:
  Authorization: $ANTHROPIC_API_KEY
EOF- Create an agentgatewaybackend, which tells the Gateway what to route to. In this case, it's using Anthropic as the LLM Provider.
Please note: When using an ai agentgatewaybackend with the Anthropic provider, agentgateway attempts to parse and re-marshal the request body as a structured LLM message, which fails on OpenClaw's native Anthropic format due to a missing type field in complex message content. Switching to a static backend pointing directly at api.anthropic.com:443 tells agentgateway to forward the request as-is without any LLM-specific processing, while still providing routing, observability, and logging on all traffic. The tls: {} policy is required because api.anthropic.com listens on HTTPS (port 443), and without it, agentgateway sends plain HTTP, which Cloudflare rejects.
kubectl apply -f- <<EOF
apiVersion: agentgateway.dev/v1alpha1
kind: AgentgatewayBackend
metadata:
  labels:
    app: agentgateway-oc
  name: anthropic
  namespace: agentgateway-system
spec:
  static:
    host: api.anthropic.com
    port: 443
  policies:
    tls: {}
EOF- Create a route that points to the path
/v1/messages, which is the format that Anthropic expects.
kubectl apply -f- <<EOF
apiVersion: gateway.networking.k8s.io/v1
kind: HTTPRoute
metadata:
  name: ocroute
  namespace: agentgateway-system
spec:
  parentRefs:
    - name: agentgateway-oc
      namespace: agentgateway-system
  rules:
  - matches:
    - path:
        type: PathPrefix
        value: /v1/messages
    backendRefs:
    - name: openclaw
      namespace: agentgateway-system
      group: agentgateway.dev
      kind: AgentgatewayBackend
EOF
Deploy OpenClaw On Kubernetes
With the Gateway deployed, let's set up OpenClaw.
Please note: This deployment is just for testing and does not include anything for persistent volumes for data that is not ephemeral. If you want that configuration, you can create a PVC and mount it on /home/node/.openclaw and /home/node/workspace.
- Create a ConfigMap to map the configuration that's needed for OpenClaw to route traffic through agentgateway. Please remember you will need to replace the
baseUrlwith the hostname or IP of your Gateway.
kubectl apply -f - <<EOF
apiVersion: v1
kind: ConfigMap
metadata:
  name: openclaw-agw-config
  labels:
    app: openclaw
data:
  agw-overlay.json: |
    {
      "gateway": {
        "bind": "lan"
      },
      "models": {
        "mode": "merge",
        "providers": {
          "anthropic": {
            "baseUrl": "http://YOUR_AGENTGATEWAY_HOSTNAME_OR_IP:8081",
            "models": []
          }
        }
      }
    }
EOF- Create a Kubernetes Deployment that points to the OpenClaw Alpine container image.
Please note: When deploying OpenClaw in Kubernetes with agentgateway, the openclaw.json config file needs to include the agentgateway baseUrl to route LLM traffic through the gateway. However, OpenClaw auto-generates its base config (including auth tokens and default settings) at startup, and any config modification, from the initial overlay or from running openclaw onboard triggers OpenClaw's built-in hot-reload, which performs a full process restart that kills PID 1 and causes the container to crash. The solution uses a wrapper shell script that pre-creates openclaw.json with the agentgateway overlay before OpenClaw starts
(so initial startup merges cleanly), and runs OpenClaw inside a while true loop so the shell remains PID 1 and automatically restarts OpenClaw whenever a config change triggers its internal restart, preventing the container from exiting.
Please note: The models: [] parameter is required by the schema, but it also causes the a ANTHROPIC_MODEL_ALIASES error. This is a known bug in v2026.3.12. The ANTHROPIC_MODEL_ALIASES error is a temporal dead zone issue that affects any config using an Anthropic primary model. The workaround is to use v2026.3.11 instead. That's why you see that image pinned in the deployment below.
kubectl apply -f - <<EOF
apiVersion: apps/v1
kind: Deployment
metadata:
  name: openclaw
  labels:
    app: openclaw
spec:
  replicas: 1
  selector:
    matchLabels:
      app: openclaw
  template:
    metadata:
      labels:
        app: openclaw
    spec:
      containers:
        - name: openclaw
          image: alpine/openclaw:2026.3.11
          ports:
            - name: gateway
              containerPort: 18789
              protocol: TCP
            - name: bridge
              containerPort: 18790
              protocol: TCP
          command:
            - sh
            - -c
            - |
              mkdir -p /home/node/.openclaw
              cp /tmp/agw-overlay.json /home/node/.openclaw/openclaw.json
              trap 'kill $(jobs -p) 2>/dev/null' EXIT
              while true; do
                docker-entrypoint.sh node openclaw.mjs gateway --allow-unconfigured
                echo "OpenClaw process exited, restarting..."
                sleep 2
              done
          volumeMounts:
            - name: agw-config
              mountPath: /tmp/agw-overlay.json
              subPath: agw-overlay.json
          resources:
            requests:
              cpu: "4"
              memory: "8Gi"
            limits:
              cpu: "4"
              memory: "8Gi"
      volumes:
        - name: agw-config
          configMap:
            name: openclaw-agw-config
EOF- Create a Service for OpenClaw. This Service will be used in the next section when implementing agentgateway for secure and observable OpenClaw traffic.
kubectl apply -f -<<EOF
apiVersion: v1
kind: Service
metadata:
  name: openclaw
  labels:
    app: openclaw
spec:
  type: ClusterIP
  selector:
    app: openclaw
  ports:
    - name: gateway
      port: 18789
      targetPort: gateway
      protocol: TCP
    - name: bridge
      port: 18790
      targetPort: bridge
      protocol: TCP
EOF
You'll now see that OpenClaw is running.
openclaw-bf55866b7-s7wn6 1/1 Running 0 4m36sOnboard OpenClaw
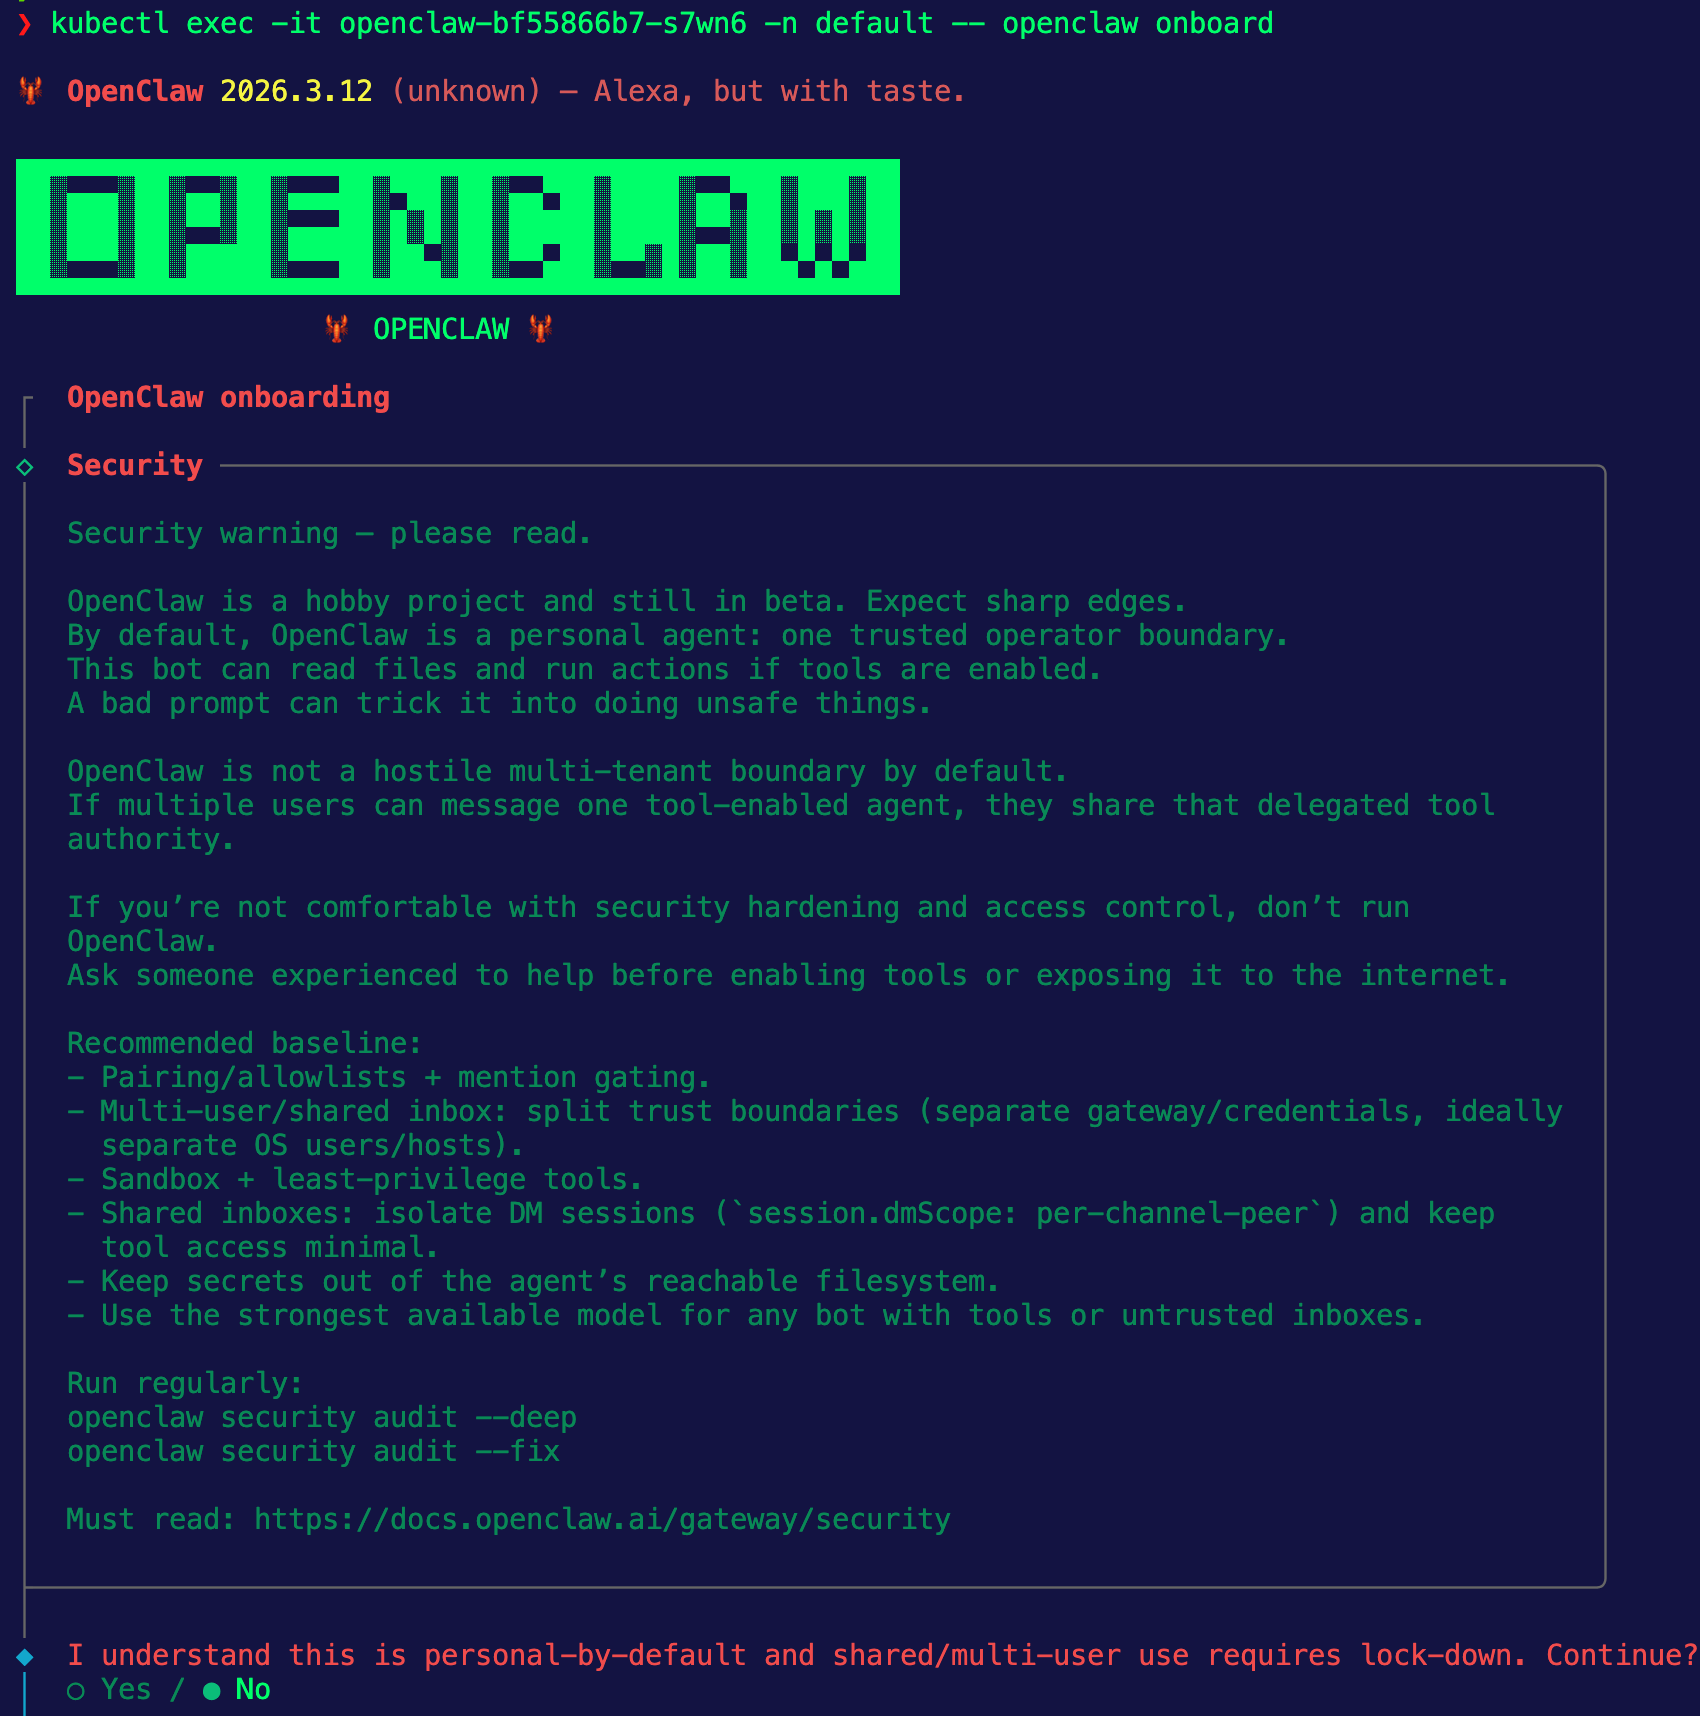
For OpenClaw to work, you need to set configurations like how you want to interact with OpenClaw (iMessage, Telegram, etc.) and the LLM Provider you want to use. To do that, you need to run the openclaw onboard command. Because this is running in Kubernetes, you can exec into the Pod.
kubectl exec -it YOUR_OPENCLAW_POD_NAME -n default -- openclaw onboardYou'll see an output similar to the below and you can get started with the onboarding process.
After the onboarding, you can test and ensure that OpenClaw is passing traffic through agentgateway.
kubectl exec OPENCLAW_POD_NAME -n default -- openclaw agent --message "Say hi"And you'll see traffic routing through agentgateway similar to the below:
2026-03-14T15:41:26.634010Z info request gateway=agentgateway-system/agentgateway-oc listener=http route=agentgateway-system/ocroute endpoint=api.anthropic.com:443 src.addr=10.224.0.149:62282 http.method=POST http.host=52.241.254.163 http.path=/v1/messages http.version=HTTP/1.1 http.status=200 protocol=http duration=2936ms
Comments ()